20 Sleek & Chic Straight Hairstyles for Black Women to Try Now

There’s a real difference between the stiff, oil-weighed straight hair a lot of us grew up seeing and the weightless, bouncy silk press that actually moves when you turn your head, and that difference is almost entirely about technique, not just the tools.
The anxiety around thermal styling is legitimate too, heat damage, reversion the moment you sweat or step into humidity, and split ends that show up months after the appointment that caused them.
What actually makes straight hair look expensive and thick isn’t more heat, it’s the haircut underneath it, blunt bases that catch light as one clean line, with internal layers built in where you can’t see them but can absolutely feel the movement.
The Golden Rules of Healthy Thermal Styling
Every style on this list depends on these three being right first.
- Prep is 80% of the result. A clarifying wash removes product buildup that insulates hair unevenly from heat, a deep moisture mask rebuilds what that wash temporarily strips, and a tension blow-dry, stretching each section taut while it dries, does more of the actual straightening work than most people give it credit for. Skip any of these three and the flat iron ends up compensating with more passes than it should ever need.
- The single-pass and temperature rule. Every additional pass of a flat iron over the same section adds cumulative heat, and cuticles that have already sealed flat don’t need to be re-sealed, they just get fried. Set the iron between 375°F and 410°F depending on density and porosity, and commit to one clean, slow pass per section instead of three quick ones.
- The night preservation protocol. Heat styling every single day is what actually causes most of the damage people blame on the original press. Wrapping hair in a satin or silk scarf at night, or setting it in large pin curls before bed, preserves the shape without a single additional pass of the iron, and it’s what keeps ends from splitting under repeated heat.
Silk Press & Sleek Classics
Maximum shine, real movement
1. The Classic Bouncy Silk Press
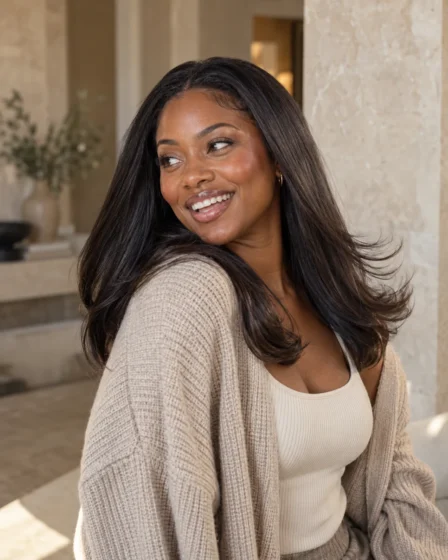
A proper silk press isn’t just flat-ironed hair, it’s a full blowout with a round brush first to build the bend and movement, then a light flat iron pass that seals the shine without flattening that bounce out. The result swings and moves the way hair naturally would if it had been born straight, though it’s still vulnerable to the humidity that causes frizz and reversion if it’s not protected.
- Best for: Natural hair transitioning between wash days, medium to thick density
- Ask your stylist: “Blow me out with a full round brush set before you flat iron, I want the bounce to come from the blowout, not just the iron.”
- Maintenance: Wrap nightly with a satin scarf, touch up only the roots between washes.
- Skip it if: You sweat heavily during workouts more than twice a week, the moisture will undo the press faster than the upkeep is worth.
2. The Bone-Straight Glass Hair Lob
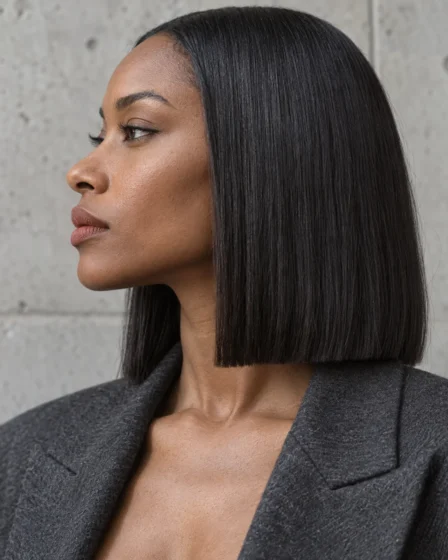
This one goes for maximum shine and zero visible texture, hair straightened pin-straight at a length that hits between the chin and shoulders. The glass-like finish depends entirely on a clean, single flat iron pass and healthy, well-sealed ends.
- Best for: Fine to medium density hair, healthy ends with minimal breakage
- Ask your stylist: “Keep the ends completely blunt, no texturizing shears, that’s what gives glass hair its reflective edge.”
- Maintenance: A weekly gloss treatment keeps the shine from dulling between salon visits.
- Skip it if: Your hair has a lot of natural texture or porosity variation, glass hair shows every inconsistency in a way looser styles hide.
3. The Sleek Middle-Part Goddess Lengths
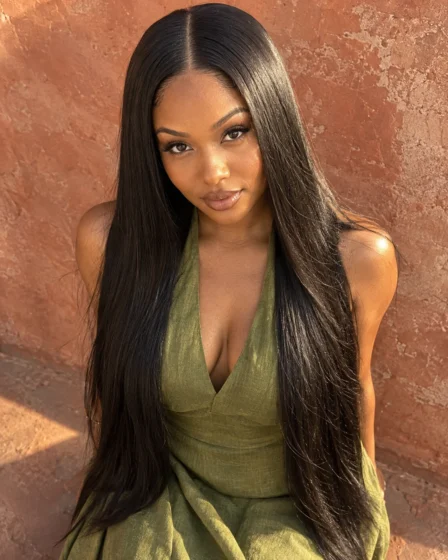
Long, straight hair parted precisely down the center reads as effortless but depends on that part being genuinely even, similar to the precise center-part looks in our sleek styling roundup. The length does most of the visual work here, minimal layering keeps the ends heavy and swingy rather than choppy.
- Best for: Longer lengths, thick to medium density that can carry weight without looking stringy
- Ask your stylist: “Keep layering minimal through the length, I want the weight at the ends, not thinned out.”
- Maintenance: Touch up the part line with a fine-tooth comb daily, a full re-press every 10 to 14 days.
- Skip it if: Your hair is fine or low-density, this length and cut combination needs real weight to avoid looking flat.
4. The 90s Fluffy Blowout with Bevelled Ends
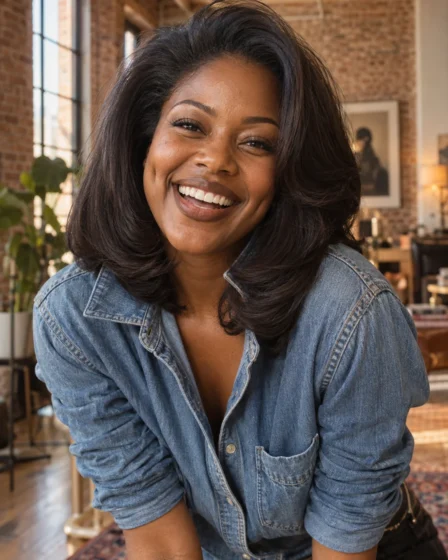
The ends curve inward or outward in one soft, rounded sweep rather than lying flat, a technique called beveling that adds volume right where hair typically loses it. It’s a nostalgic silhouette that photographs beautifully because the bevel catches light differently than a flat-ironed straight line does.
- Best for: Chin-length to shoulder-length hair, medium to thick density
- Ask your stylist: “Round-brush the ends under with real tension, I want a visible bevel, not just a slight flip.”
- Maintenance: Sleep with a bonnet and re-set the bevel with a curling iron on the ends every few days.
- Skip it if: You want zero daily styling, the bevel softens within a day or two and needs regular reinforcement.
Straight Bobs & Cropped Cuts
Sharp lines, real personality
5. The Blunt Chin-Length Silk Bob
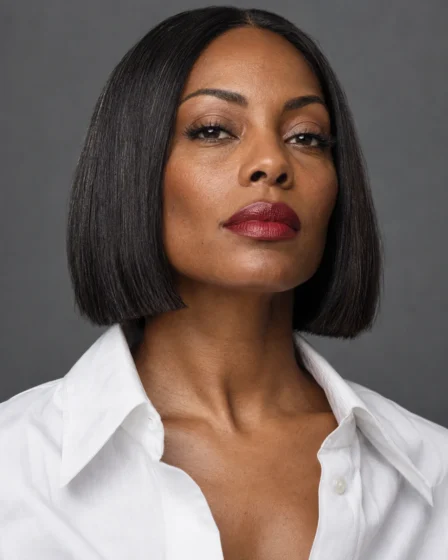
A hard, blunt line at the chin creates maximum visual density, since every strand ends at exactly the same point instead of tapering out gradually. Paired with a proper silk press finish, this reads as one of the most polished, put-together silhouettes on the whole list.
- Best for: Medium to thick density, healthy mid-lengths and ends
- Ask your stylist: “Cut this completely blunt, no layers at all, I want one clean line.”
- Maintenance: Weekly deep conditioning keeps blunt ends from looking dry or splitting, which shows immediately at this length.
- Skip it if: Your ends have existing damage, a blunt cut has nowhere to hide split or fragile strands.
6. The Side-Swept Asymmetrical Straight Bob
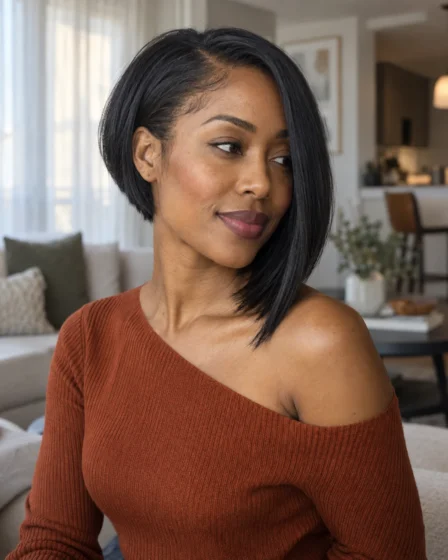
One side cut noticeably longer than the other breaks the perfect symmetry a straight bob usually relies on, giving the whole style more edge and personality. Styled straight, the asymmetry reads as a deliberate, architectural choice rather than an accident, and a touch of dimensional color makes the angle even more visible.
- Best for: Fine to medium density, straight to slightly wavy natural texture
- Ask your stylist: “Cut one side about two inches longer, angled so it points toward my chin when styled straight.”
- Maintenance: Re-press every 7 to 10 days, the shorter side shows regrowth and flip-out fastest.
- Skip it if: You want a completely symmetrical, classic look, this style is specifically meant to be uneven.
7. The Straight Pixie with Feathered Layers
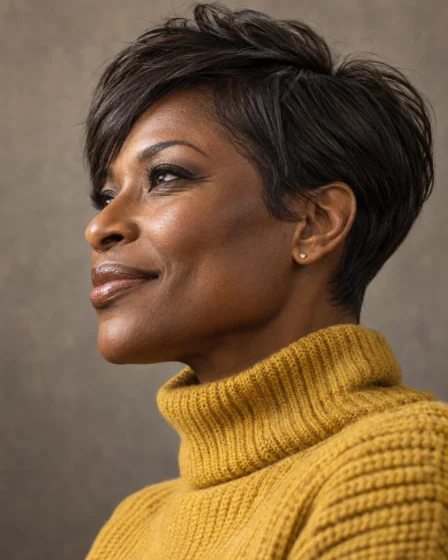
Short, straight hair needs internal texture to avoid looking flat and helmet-like, and feathered layers cut into the crown and sides give it that movement without adding length. This is one of the lowest-heat-exposure styles here since there’s simply less hair to straighten.
- Best for: Any density, works especially well on fine hair since there’s less weight to fight
- Ask your stylist: “Feather the layers through the crown specifically, I want lift there, not just at the ends.”
- Maintenance: A quick flat iron touch-up on the top section every few days keeps the feathering crisp.
- Skip it if: You’re not ready for frequent trims, short feathered layers grow out and lose their shape within four to five weeks.
8. The Bevelled French Bob with Wispy Bangs
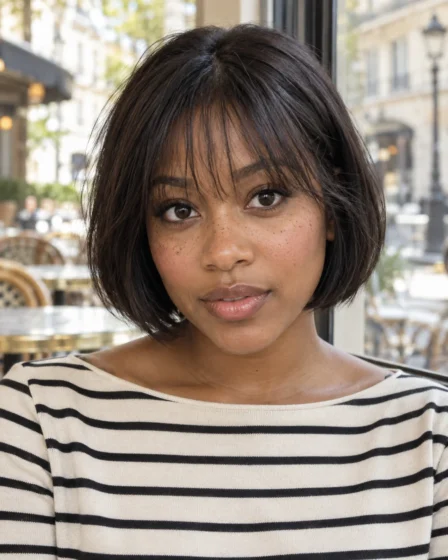
A chin-length bob with the ends curved under and a soft, wispy fringe combines two techniques into one polished silhouette. The bangs specifically need to stay wispy rather than blunt, a thick straight-across fringe fights the softness the rest of the cut is going for.
- Best for: Medium density, healthy hairline for the bangs to sit against
- Ask your stylist: “Point-cut the bangs so they’re wispy and soft, not a solid blunt line across my forehead.”
- Maintenance: Bangs need trimming every 3 to 4 weeks to stay wispy instead of growing into a solid curtain.
- Skip it if: You don’t want to commit to bang upkeep, wispy fringes lose their shape fast without regular trims.
9. The Retro Flipped-Out Collarbone Lob
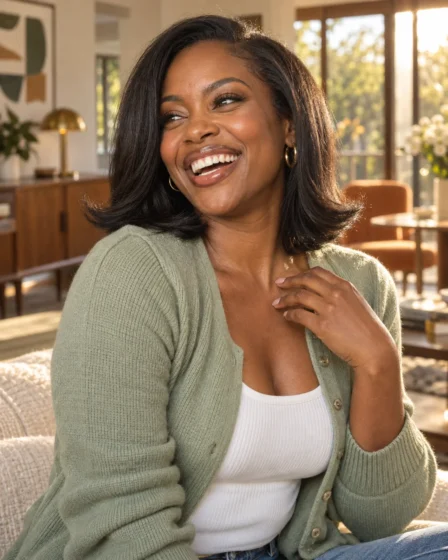
Length sitting right at the collarbone with the ends flipped outward rather than under creates a retro, confident silhouette, genuinely different from the inward-curled bevel styles elsewhere on this list. It’s a bold finishing choice that works especially well with a bit of natural body already in the hair.
- Best for: Medium to thick density, collarbone to just-below-collarbone length
- Ask your stylist: “Flip the ends out, away from my neck, not under, that’s the whole point of this style.”
- Maintenance: A large-barrel curling iron reinforces the flip every 2 to 3 days between re-presses.
- Skip it if: Your hair is very fine, flipped-out ends on fine hair tend to look wispy rather than bold and defined.
Updos & Ponytails
Polish without full commitment
10. The Half-Up, Half-Down Sleek Ponytail
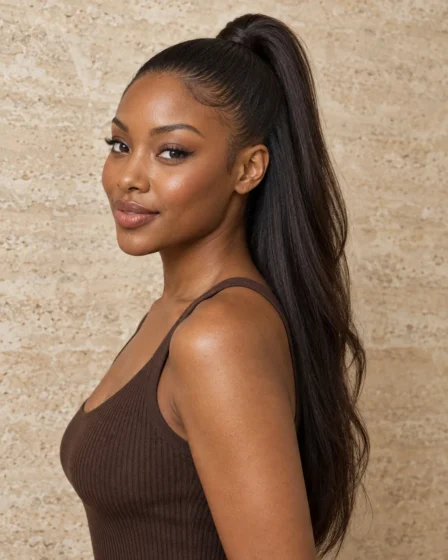
Only the crown section pulls back into a small, sleek ponytail while the rest stays straight and down, giving you the polish of an updo without fully committing to one. The key is keeping the pulled-back section genuinely smooth, any bumps there undercut the sleekness of the whole look.
- Best for: Any length past the shoulders, straight or freshly pressed hair
- Ask your stylist: “Keep my crown layers slightly longer, I want enough hair to make a clean half-up ponytail without it looking thin.”
- Maintenance: A boar-bristle brush and light gel on the pulled-back section keeps it smooth through the day.
- Skip it if: Your hair is freshly washed and slippery, this style holds better on day-two or day-three straight hair.
11. The Minimalist Sleek Low Ponytail
A low, glass-smooth ponytail wrapped at the base to hide the elastic is one of the most versatile straight styles here, equally at home in a boardroom or at dinner. Every flyaway shows on a style this clean, so the smoothing step matters more than almost anywhere else on this list.
- Best for: Any density, works best with hair that’s already been silk pressed or flat ironed recently
- Ask your stylist: “I want the ponytail wrapped, not just an elastic showing, and gel the edges down clean.”
- Maintenance: Touch up edges with a soft-bristle brush and a small amount of gel throughout the day.
- Skip it if: You have very short layers around your face, they won’t stay smooth in a low pull-back.
12. The Sleek High Top-Knot with Framing Tendrils
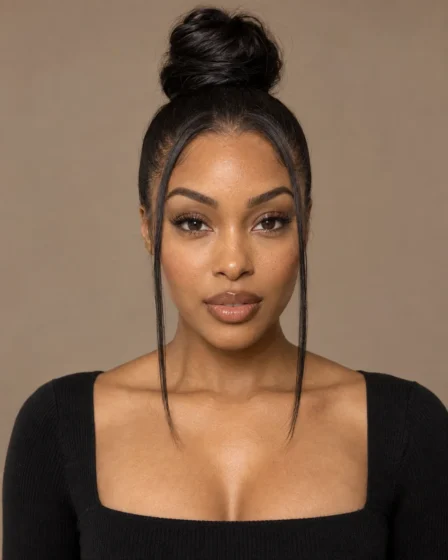
A high, smooth bun with just a couple of straight face-framing pieces left out softens what could otherwise be a severe, fully pulled-back look. The tendrils do a lot of work here, styled straight and sleek rather than curled, they keep the whole style consistent with the straight-hair theme.
- Best for: Medium to long length, enough hair to gather into a substantial bun
- Ask your stylist: “Leave two thin pieces out at my temples specifically for the tendrils, straight, not curled.”
- Maintenance: Re-flat-iron just the tendrils daily if needed, the bun itself holds for several days.
- Skip it if: You have very short hair, there won’t be enough length to gather into a high bun with tendrils left out.
Layered & Textured Straight Styles
Movement without curl
13. The Cascading Butterfly Face-Framing Layers
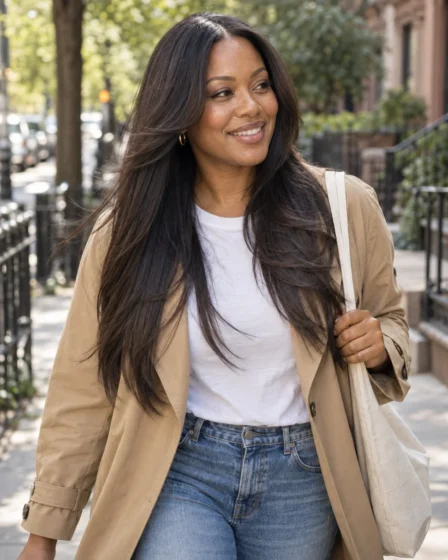
Short layers around the face cascade into longer length toward the back, a shape that adds real movement to straight hair without needing any curl or wave to create it. Styled straight and sleek, the layers still catch light differently at each length, which keeps the whole style from reading as flat.
- Best for: Long hair, medium to thick density to support the layered shape
- Ask your stylist: “Cut the face-framing layers short enough to hit my cheekbones, with the rest cascading down from there.”
- Maintenance: Re-press every 10 to 12 days, the shorter face-framing layers show flip-out first.
- Skip it if: Your hair is fine or thin, this much layering can leave the ends looking sparse rather than full.
14. The Modern Straight Shag with Curtain Fringe
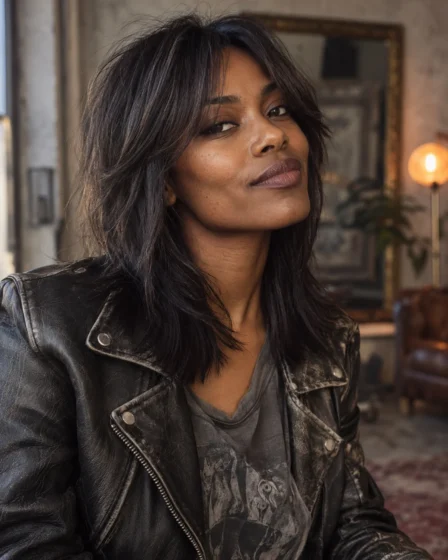
Shag layers cut throughout the length, paired with a curtain fringe parted at the center, gives straight hair a textured, lived-in quality that a single blunt line can’t achieve. It’s genuinely one of the more forgiving straight styles here since the layering hides small inconsistencies a blunt cut would show.
- Best for: Any density, especially good for hair with some natural texture that’s being straightened
- Ask your stylist: “Cut real shag layers throughout, not just at the ends, and part the fringe to curtain both sides.”
- Maintenance: A texturizing spray on the ends between presses keeps the shaggy quality from falling flat.
- Skip it if: You want a sleek, polished look specifically, this style is built for texture over polish.
15. The Full-Density Straight U-Cut
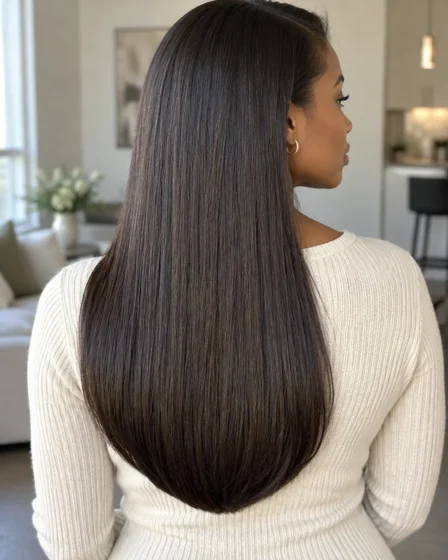
A U-shaped cut at the back keeps maximum length and density at the center while gently tapering the sides, a classic silhouette that reads as thick and healthy without any layering to thin it out. It’s one of the most low-maintenance straight cuts here precisely because there’s so little going on structurally.
- Best for: Thick to medium density, longer lengths where you want to preserve as much weight as possible
- Ask your stylist: “Cut a U-shape at the back, not a V, I want to keep the fullness at the center.”
- Maintenance: Re-press every 10 to 14 days, minimal daily upkeep since there’s no texturizing to maintain.
- Skip it if: You have fine or thin hair, this cut depends on real density to create its signature fullness.
What to Tell Your Stylist in the Chair
“Use a heat protectant on every section before you touch the iron, not just the first pass of the day.”
“One clean pass per section, please, I’d rather come back sooner for a touch-up than fry my ends today.”
“Keep any internal layers invisible from the outside, I want length and movement, not choppiness.”
“Show me the temperature setting before we start, I want to know we’re not going above what my hair actually needs.”
Habits That Cause Damage vs. Habits That Keep Hair Healthy
| Habit | Causes Heat Damage & Stiff Hair | Keeps Straight Hair Bouncy & Healthy |
|---|---|---|
| Product | Heavy oil greasing for shine | Weightless serum, applied sparingly |
| Flat iron technique | Multiple passes over the same section | Single, slow pass with real tension |
| Nighttime | Sleeping on cotton, hair loose | Satin or silk wrap, or pin curls set before bed |
| Wash-day drying | Air-drying loosely before flat ironing | Tension blow-dry, stretching each section first |
| Heat frequency | Flat ironing daily regardless of need | Heat only on wash day, preserved between |
Frequently Asked Questions
How often can natural hair be straightened without losing curl pattern?
Most stylists recommend limiting a full silk press or flat iron session to once every one to two weeks, with the days between relying on wraps and pin curls rather than fresh heat. Curl pattern loss usually comes from heat frequency and temperature, not from straightening itself, so a properly protected, well-spaced routine can go on for a long time without permanent change to how your hair curls when wet.
How do I keep my straight hair from reverting when working out or in humidity?
Reversion happens when moisture reaches the hair shaft and the natural curl pattern reasserts itself, so the fix is blocking that moisture rather than fighting the humidity itself. A lightweight anti-humidity serum on the lengths, plus a loose, low-tension wrap or braid during a workout, protects the style far better than trying to avoid sweat entirely, which usually isn’t realistic anyway.
What is the difference between a silk press and a regular blowout?
A blowout uses a round brush and hot air to stretch and straighten hair as it dries, while a silk press adds a flat iron pass afterward to seal in that straightness and add the signature glass-like shine. A blowout alone tends to have more natural movement and reverts faster, while a silk press holds longer but takes more total heat exposure to achieve.
How long should a professional silk press realistically last?
A well-done silk press, maintained with nightly wraps and kept away from heavy moisture, typically holds for one to two weeks before it needs a refresh. Humidity, heavy sweating, and skipping the nightly wrap routine are the three things most likely to cut that timeline shorter.
Save These 15 Straight Styles
Pin this guide to your hair board before your next appointment, having the exact ask-your-stylist language ready makes the chair conversation so much easier.
Straight hair on Black hair was never about erasing texture, it’s one more way to wear the same hair that curls, coils, and does everything else it’s capable of. The healthiest version of any of these fifteen comes down to the prep and the protection between appointments as much as the cut itself, and a stylist who respects that will always give you a press that lasts.