
12 Waterfall Braid Hairstyles That Actually Hold All Day

Waterfall braid hairstyles look like a ten-step Pinterest puzzle until you actually try one, and the truth is it’s just a regular three-strand braid with one small twist.
Top strand crosses over, bottom strand drops and cascades free, and a fresh strand from the top picks up right where it left off, that’s the entire trick. I’ve walked more brides and prom clients through this exact drop-strand technique than I can count, on stick-straight hair and thick curls alike, and it never fails to make someone stop and check the mirror twice.
Grab a light texturizing spray before you start, clean slippery hair tends to let the strands slip loose within the hour.
Quick prep tip: Before you start braiding, mist a light texturizing spray or work a dime-size amount of mousse through dry hair. Freshly washed, silky-smooth hair is gorgeous but it’s also slippery, and a slippery base means your drop-strands loosen fast. A little texture gives the braid something to actually grip.
1. Classic Single Waterfall Braid on Beach Waves
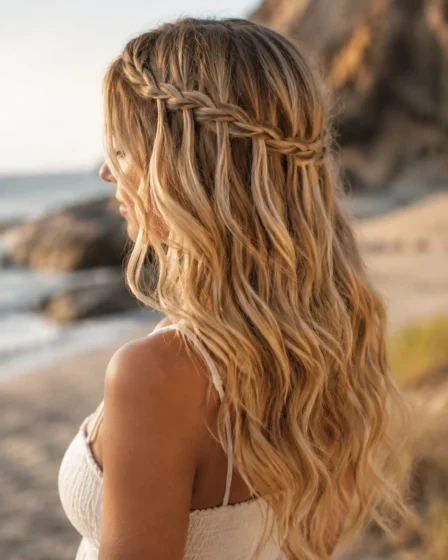
This is the waterfall braid at its most effortless. Start a three-strand braid just above one ear, drop the bottom strand every time it crosses down, and pick up a new section of loose hair to replace it as you work across the back of your head. Once you reach the other ear, pin the tail invisibly underneath the hair below it. On beach waves the dropped strands blend straight into the texture, so it reads soft and unplanned. It holds through a full day of normal wear and only needs a light restyling spray by evening.
- Skip if: your hair is freshly washed and silky with nothing else added, the strands will slip out before you finish pinning the tail.
🔒 Stylist secret
Slightly second-day hair holds this braid better than fresh wash-day hair ever will.
- Time: 8 min
- Best for: wavy or textured hair
- Try: texturizing spray
2. Waterfall Braid on a Short Bob or Lob
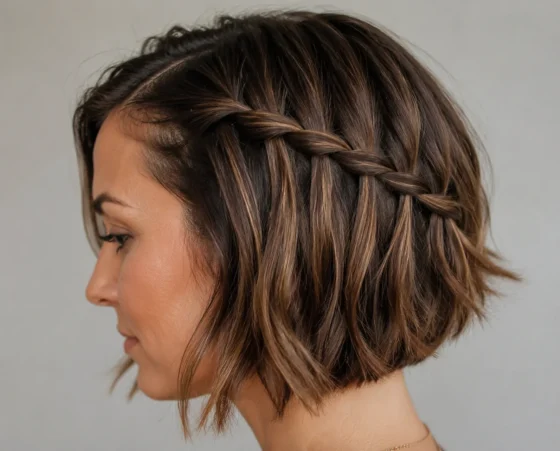
Short hair actually makes this braid easier to keep, since there’s less weight pulling the drop-strands down. Section a piece just behind your part and braid diagonally toward the nape, dropping strands as you go and letting them fall into the layers below. Because a bob has less length to work with, tuck the end under a bobby pin rather than trying to hide a full tail. It stays neat through office hours and holds especially well on hair with some natural body, needing only a quick pin check by afternoon.
- Skip if: your cut is a very short choppy pixie, you need at least chin length for the drop-strands to have somewhere to go.
🔒 Stylist secret
Curl the ends the night before with a wand, bent hair holds a bob braid far more securely than pin-straight strands.
- Time: 6 min
- Best for: bob or lob length
- Try: sea salt spray
3. Double Waterfall Braid in Parallel Rows
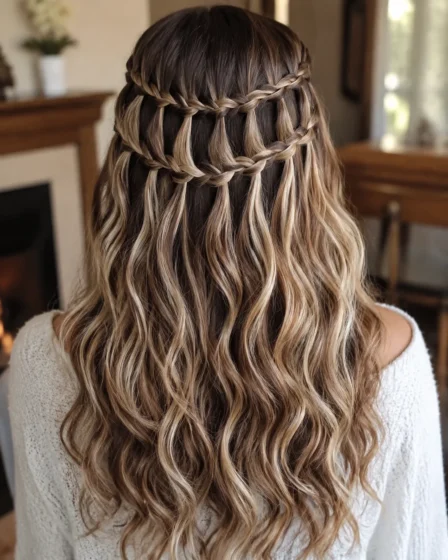
Two rows of waterfall braiding, one stacked just below the other, give short and medium hair a fuller look without adding a single extension. Braid the first row close to your part, drop your strands, then start a second braid directly beneath it using the hair the first row released. This works best on hair with some natural thickness, since two rows on very fine hair can look sparse instead of full. Expect this one to hold for six to eight hours before the lower row needs a light re-pin.
- Skip if: your hair is naturally very fine or thinning, two rows on thin strands tends to look patchy rather than lush. If that’s you, our guide to getting thicker hair naturally has a few habits worth building first.
🔒 Stylist secret
Keep the two rows slightly offset rather than perfectly stacked, it reads more natural and hides any gaps better.
- Time: 12 min
- Best for: medium to thick hair
- Try: root-lifting mousse
4. Half-Up Waterfall Crown or Halo Braid
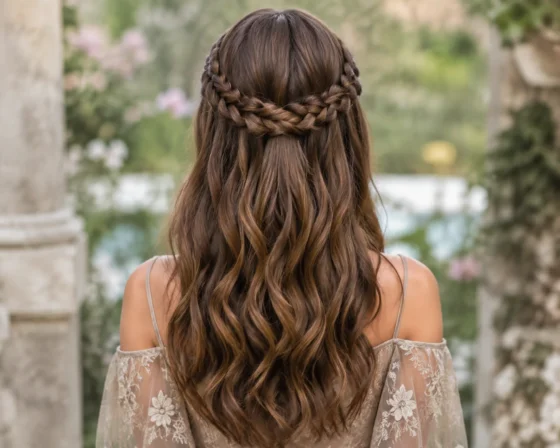
Two waterfall braids start above each ear and travel back toward the crown, meeting and pinning together at the center back of your head. Everything above the braids stays smooth and everything below flows free, which is exactly what gives this look its fairy-tale, halo effect. Because both braids connect and pin at the back, this is one of the more secure options on the list and holds beautifully through hours of dancing or standing. It’s a genuine favorite for prom and for bridesmaids who want their length shown off, not covered.
- Skip if: you dislike bobby pins, securing the meeting point at the back needs a few crossed pins to stay put through a whole event. If half-up looks are already your thing, our half-up pigtails hairstyles roundup has more playful takes on the same idea.
🔒 Stylist secret
Cross two bobby pins in an X right where the braids meet, it holds nearly double the weight of a single straight pin.
- Time: 15 min
- Best for: long hair
- Try: pins matched to your hair shade
5. Waterfall Braid with Loose Hollywood Curls
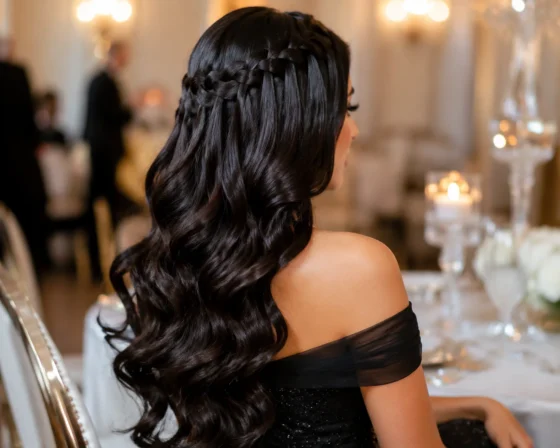
A structured waterfall braid sits at the crown while the rest of the hair falls in big, glossy Hollywood waves underneath. Curl the hair first, let the curls cool completely, then braid over the top so the braid has something textured to grip rather than smooth flat hair. This is a red carpet and wedding reception staple because the finished look photographs beautifully from every angle. Set the whole style with a strong hold hairspray, since the curls are doing most of the work and need to survive the night.
- Skip if: it’s a humid or rainy day and your natural texture leans frizzy, unless you commit to a strong hold spray. Our guide to getting rid of frizzy hair covers the prep that actually helps curls survive humidity.
🔒 Stylist secret
Curl away from your face on every section, it reads far more polished in photos than curls all rolled the same direction.
- Time: 20 min
- Best for: hair that holds curl well
- Try: strong hold finishing spray
6. Waterfall Braid into a Side Fishtail
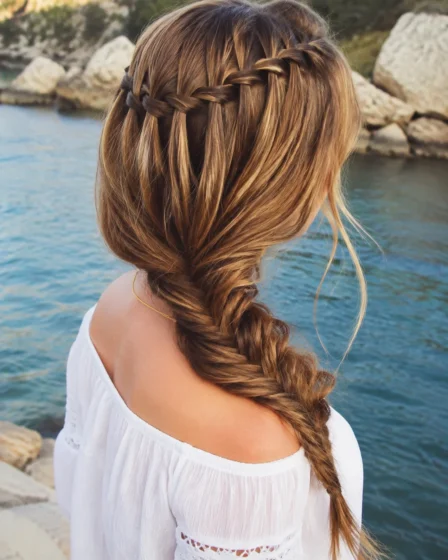
The top section starts as a classic waterfall braid, and once you reach the ear, you simply switch technique and carry the same hair into a fishtail braid down to the ends. It gives one braid two completely different textures, structured drop-strands up top and fine, feathery texture below. This works best on hair that’s one length or close to it, since choppy layers will pop out of the fishtail as you get closer to the ends. Loosen the fishtail gently with your fingers once finished, it holds better slightly undone than pulled tight.
- Skip if: you have short face-framing layers, they won’t stay tucked in by the time you reach the ends. For more mix-and-match braid combinations like this one, our cute and quick braided hairstyles list is worth a scroll.
🔒 Stylist secret
Switch your grip from three sections to two thin strands the moment you start the fishtail, that’s what keeps the texture change looking intentional.
- Time: 14 min
- Best for: one-length long hair
- Try: light hair oil on the ends
7. Straight and Sleek Waterfall Braid
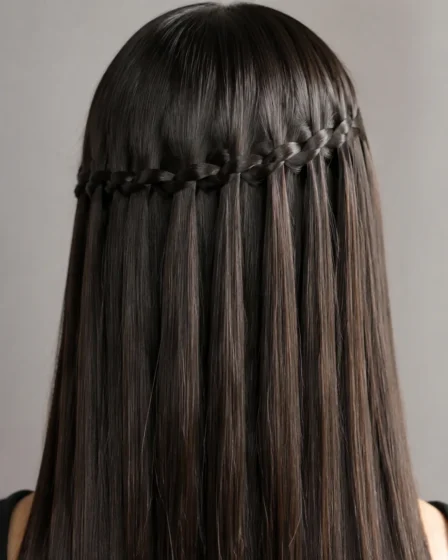
Flat iron your hair completely straight first, then braid a single waterfall section with a fine tooth comb to keep every part line crisp. Straight hair gives the drop-strands a glassy, high-shine cascade that leans closer to high fashion editorial than casual braiding. Because there’s no natural texture to hide small mistakes, take your time sectioning evenly and keep tension light so the braid doesn’t pucker. This style holds cleanly for four to five hours before flyaways start needing a smoothing serum.
- Skip if: your cut has heavy face-framing layers, uneven ends show up far more obviously against pin-straight hair than against waves.
🔒 Stylist secret
Comb through with a fine tooth comb before every single cross, it’s the difference between a crisp editorial line and a lumpy braid.
- Time: 10 min
- Best for: straight one-length hair
- Try: smoothing serum
8. Waterfall Braid into a Messy Low Bun
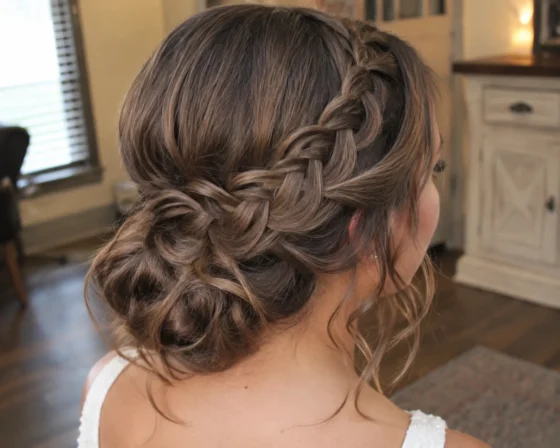
Start the waterfall braid at the front hairline and let it travel back and down, then gather everything, braid included, into a loose, textured bun low at the nape. Pull a few pieces free around the bun for an undone, romantic finish rather than a tight, polished one. This combination is a genuine bridal and dinner date favorite because it reads elegant without looking fussy. Use enough U-shaped pins to anchor the bun’s weight, since a heavy bun can gradually pull the braid loose over several hours.
- Skip if: your hair is very thick and heavy without sturdy U-pins on hand, the bun’s weight needs real support to stay put. Looking for other easy long-hair options for work or dinner plans? Our polished work hairstyles for long hair guide has a few.
🔒 Stylist secret
Tease the bun slightly before pinning, it fills gaps and hides thin spots far better than a smooth twist would.
- Time: 18 min
- Best for: medium to long hair
- Try: U-shaped bobby pins
9. Diagonal Waterfall Braid Across the Back
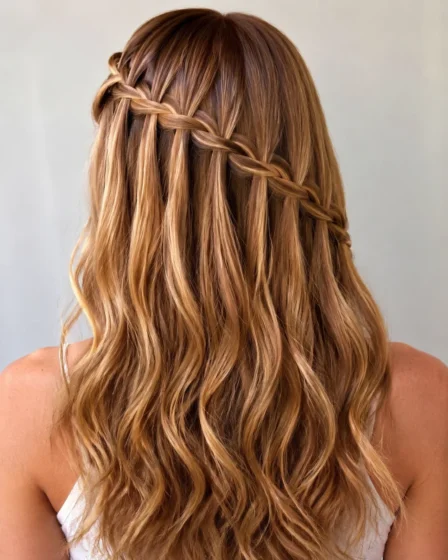
Instead of braiding straight across, this version starts near the top of one ear and travels diagonally down to the opposite side of the nape. The angled line gives a dramatic, editorial back view that’s especially striking when hair is left down or in loose curls below the braid. This one genuinely benefits from a second set of hands or a 360 mirror, since keeping the diagonal line even is trickier without seeing the back of your own head. It holds just as long as a straight waterfall braid, roughly a full day with normal wear.
- Skip if: you’re styling solo for the first time, a diagonal line is much easier to keep even with a friend or a 360 mirror helping you check the angle.
🔒 Stylist secret
Braid toward a mirror set up behind you rather than twisting to look over your shoulder, it keeps your hands and the angle far steadier.
- Time: 16 min
- Best for: any length past the shoulders
- Try: a handheld mirror
10. Waterfall Braid with Floral or Pearl Accents
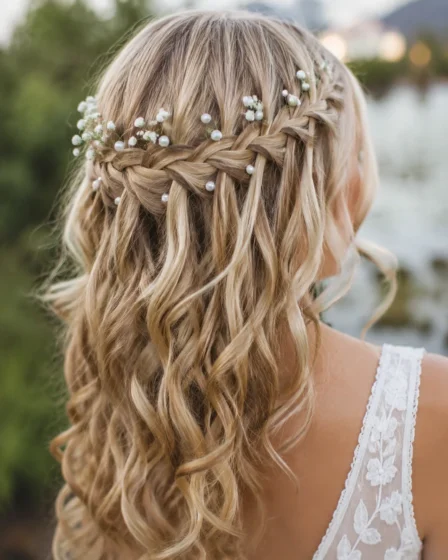
The natural gaps where each drop-strand crosses over are the perfect spot to tuck in tiny baby’s breath stems or small pearl-topped pins. Braid as usual, then go back through and add one accent every two or three crossings rather than crowding every gap. This is a destination wedding and festive photoshoot favorite since the accents catch the light beautifully in photos. Fresh flowers wilt after several hours, so if you need this look to last a full day, silk or fabric flowers hold up far better.
- Skip if: it’s a rougher, all-day event where pins might fall or get lost, save the delicate accents for photo moments instead.
🔒 Stylist secret
Push each pin in at a slight upward angle rather than straight down, it locks into the braid instead of sliding out under its own weight.
- Time: 22 min
- Best for: long hair with visible braid gaps
- Try: small floral or pearl hair pins
11. Waterfall Loop Braid for a Cascading Ribbon Effect
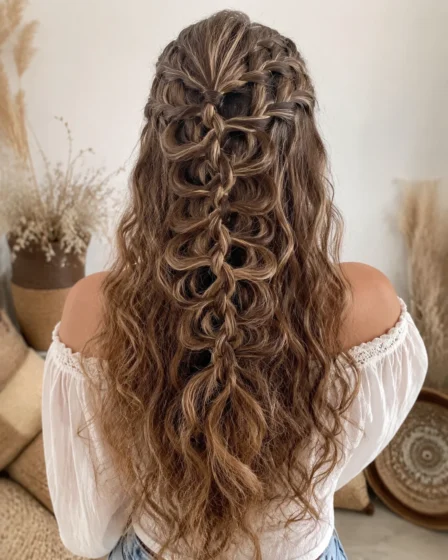
Rather than letting each dropped strand hang flat, this version loops each section back through the braid before releasing it, creating a 3D, ribbon-like texture instead of a flat cascade. It takes a little more practice than a standard waterfall braid, since each loop needs a slight twist before you tuck it through. Curled or textured hair holds the loop shape far more reliably than straight hair, which tends to relax the loops flat within an hour. This is currently one of the more trending takes on the classic waterfall technique.
- Skip if: your hair is untextured and pin-straight, curl or crimp it first or the loops will fall flat almost immediately.
🔒 Stylist secret
Loop each strand the same direction every single time, mixing directions is the number one reason this braid looks messy instead of intentional.
- Time: 25 min
- Best for: curled or crimped hair
- Try: texturizing spray before curling
12. Waterfall Braid into a High Textured Ponytail
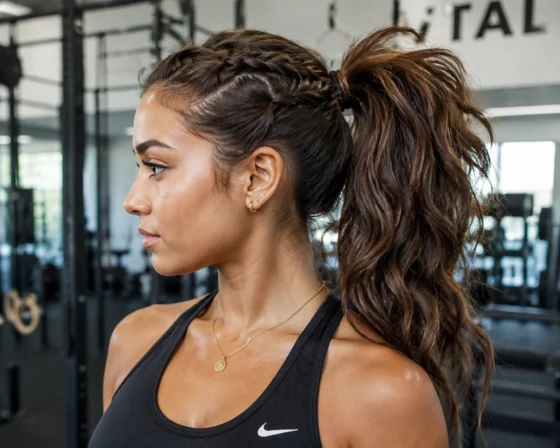
A side waterfall braid starts near the front hairline and transitions directly into a high, bouncy ponytail secured at the crown. Backcomb the ponytail slightly at the base before smoothing the top layer over it, that’s what gives this look its athletic-glam volume instead of a flat, deflated tail. It’s a genuinely versatile pick that moves from workout to going-out with barely any changes. Expect a solid full day of hold, though a high pull does add some tension at the hairline by evening.
- Skip if: you have a sensitive hairline or thinning edges, a high, tight pull can add noticeable tension there over several hours.
🔒 Stylist secret
Wrap a small section of hair around the elastic and pin it underneath, it hides the band completely and looks far more finished.
- Time: 12 min
- Best for: hair with length for a ponytail
- Try: a teasing brush at the base
Quick Comparison: Which Waterfall Braid Fits Your Day
| Hairstyle | Time Needed | Ideal Hair Type | Hold Level |
|---|---|---|---|
| Classic Single, Beach Waves | 8 min | Wavy or textured | All day |
| Bob or Lob Version | 6 min | Bob or lob length | Full workday |
| Double, Parallel Rows | 12 min | Medium to thick | 6-8 hours |
| Half-Up Crown or Halo | 15 min | Long hair | All day, secure |
| With Hollywood Curls | 20 min | Curl-friendly hair | Full evening |
| Into a Side Fishtail | 14 min | One-length long hair | 6-7 hours |
| Straight and Sleek | 10 min | Straight one-length | 4-5 hours |
| Into a Messy Low Bun | 18 min | Medium to long | All day |
| Diagonal Across the Back | 16 min | Past-shoulder length | Full day |
| Floral or Pearl Accents | 22 min | Long hair | Several hours |
| Waterfall Loop Braid | 25 min | Curled or crimped hair | A few hours |
| Into a High Ponytail | 12 min | Longer hair | Full day |
Whichever of these 12 waterfall braid hairstyles you pick first, keep the 3-second rule in mind and you’re already ahead of the puzzle everyone thinks this braid is.
The 3-Step Beginner Cheat Sheet
Start a normal three-strand braid.
Let the bottom strand drop instead of crossing it, that’s your cascade.
Pick up a fresh section from the loose hair nearby to replace it, then repeat down the line.
Product Essentials
Lightweight dry texturizing spray
U-shaped bobby pins
Frequently Asked Questions
Can I do a waterfall braid on greasy or unwashed hair?
Yes, actually second or third day hair holds this braid better than freshly washed hair. A little dry shampoo at the roots gives your fingers extra grip while you’re sectioning.
How do I stop the dropped strands from tangling as the day goes on?
Smooth a small amount of light hair oil or serum over the dropped sections once you’ve finished braiding. It weighs the strands down just enough to stop them puffing up or catching on each other.
Which hair type holds a waterfall braid the longest?
Hair with natural wave or a bit of texture holds the shape better than pin-straight hair, since the braid has something to grip. If your hair is naturally straight, curl or texture it lightly before you start.
Can I sleep in a waterfall braid overnight?
It’s fine to sleep in one loosely, just switch to a silk or satin pillowcase first so the braid doesn’t get roughed up or frizzy overnight. In the morning it becomes a relaxed, undone version of the same look.