15 One-Sided Wedding Hairstyles (That Actually Stay Put All Night)

Every one-sided wedding hairstyle looks like an absolute dream in the Pinterest photo, glossy waves cascading over one shoulder, not a hair out of place.
Then the real day happens: three hours in, your carefully swept hair has slipped back to center, one side of your dress strap or your favorite drop earring is completely hidden, and you’re sweating under a heavy curtain of hair you can’t move without unraveling the whole look.
I get why brides both love and dread this style, it’s the most romantic, photogenic option out there, but it’s also the one most likely to fall apart the second you hit the dance floor.
So here’s the golden rule before anything else: always sweep your hair over your bare shoulder, meaning the side without the strap, sleeve, or dress detail, and let your other ear, the one wearing your statement earring, stay fully visible.
Get that one decision right and every style below will actually work with your dress instead of fighting it all night. Let’s find your match.
1. Classic Old Hollywood Deep Side Waves
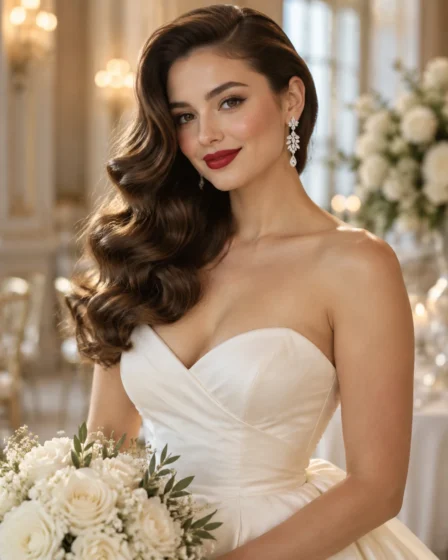
Curl in large sections with a wide barrel iron, curling away from your face, then pin the underneath layer close to the scalp near your ear before smoothing the top layer over it. Set the deep side part first so the waves have a clear direction to fall in.
💍 Bridal Stylist Hack
Spritz a light anti-humidity setting spray before you curl, not after. Setting from the inside out means the wave holds its shape through sweat and humidity for hours, instead of just sitting on top of hair that frizzes underneath.
Neckline & Jewelry Match: Sweetheart neckline, chandelier or drop earrings on your exposed ear.
2. Textured Bohemian Side Fishtail Braid
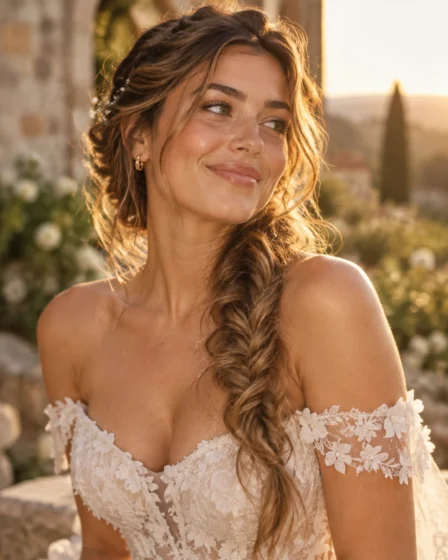
Fishtail braid diagonally across the back toward one shoulder, keeping your tension loose the entire way down. Once you reach the end, gently pancake the braid by pulling each loop a little wider for that soft, boho volume.
💍 Bridal Stylist Hack
Before you pancake it loose, tuck one small elastic in near the nape as a hidden checkpoint. If the outer braid loosens on the dance floor, that inner anchor keeps the whole structure from sliding, so it just looks more relaxed instead of falling apart.
Neckline & Jewelry Match: Off-shoulder neckline, small studs or huggies so the earring doesn’t compete with the texture.
3. Low Romantic Side Chignon with Tendrils
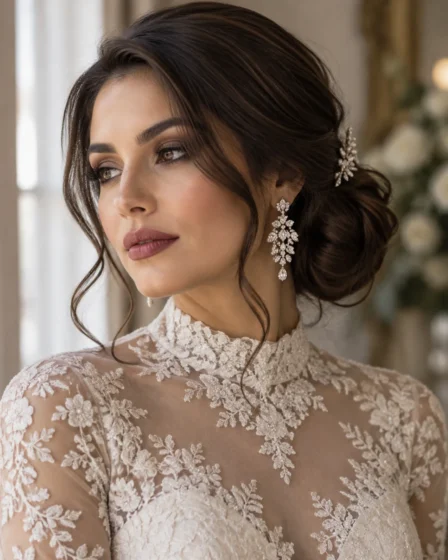
Gather your hair low at the nape and twist it into a loose bun positioned toward one side, pulling a few soft tendrils out around your face. Keep the twist gentle rather than tight, a chignon should look effortless, not scraped back.
💍 Bridal Stylist Hack
Cross-pin at two or three points around the bun instead of jamming five pins into one spot. Spreading the weight out means no single point is pulling on your scalp, which is exactly what causes that dull ache by the end of the reception.
Neckline & Jewelry Match: High-neck or illusion neckline, statement chandelier earrings since your ears carry the jewelry focus here.
4. Side-Swept Dutch Braid with Fresh Florals
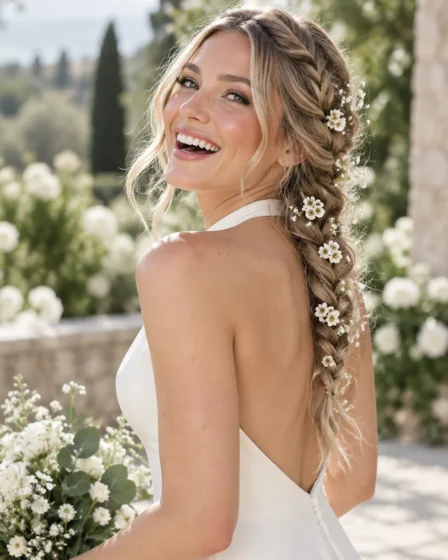
Dutch braid from the crown diagonally down toward one shoulder, keeping it tight enough to hold structure but not scalp-tight. Secure the end with a clear elastic and tuck the tail underneath so it disappears into the braid.
💍 Bridal Stylist Hack
Never pin raw wet stems straight into hair. Wrap each floral stem tightly in floral wire, then a thin layer of waterproof tape, before pinning it in. It stops wilting, staining, and stray petals dropping into your hair mid-ceremony.
Neckline & Jewelry Match: Halter or off-shoulder neckline, keep earrings minimal since the florals are already your statement piece.
5. Sleek Glossy Asymmetrical High Ponytail
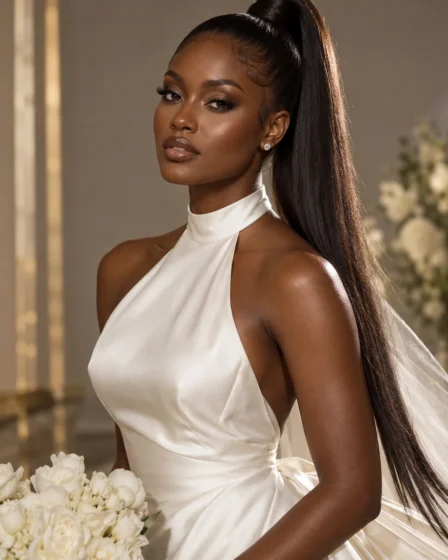
Smooth hair back with a fine-tooth comb and a shine serum, gathering it slightly off-center and high on the head. Wrap a small section around the base to hide the elastic completely.
💍 Bridal Stylist Hack
Use two elastics, not one. Snap the first one just enough to hold tension, then loop a second thin elastic on top in the opposite twist direction. That double lock is the actual reason a sleek ponytail survives hours of dancing without working loose.
Neckline & Jewelry Match: Halter or high-neck necklines that already show the neck, paired with small hoops or studs.
6. Vintage Marcel Finger Waves for Bob or Lob Lengths
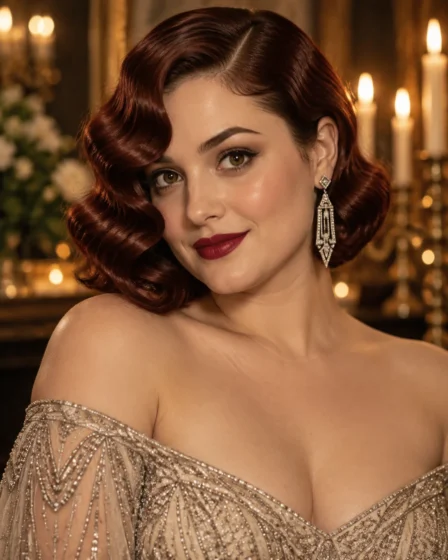
Section damp hair and use your fingers with a fine comb to shape S-curve waves close to the head, pinning each wave flat with duckbill clips while it sets. Let it fully dry before removing a single clip.
💍 Bridal Stylist Hack
Use a lightweight setting foam instead of gel for the actual wave shaping. Gel dries crunchy and cracks the second you lean your head on a shoulder for a photo, foam sets soft and flexible so the waves survive hugs, hair down, all of it.
Neckline & Jewelry Match: Sweetheart or off-shoulder, art deco drop earrings on the exposed ear to match the era.
7. Messy Twisted Side Bun for Bridesmaids
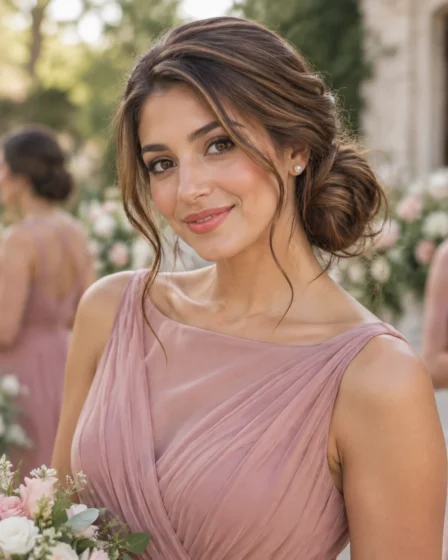
Twist hair loosely toward one side and gather it into a low bun, pulling a few pieces loose around the face for texture. This one is built to be fast and forgiving when you’ve got a whole bridal party to get through.
💍 Bridal Stylist Hack
For bridesmaids with very different hair lengths, tuck a small mesh doughnut bun form under the thinner hair before twisting. Every bun ends up the same size regardless of how much hair each person is actually working with.
Neckline & Jewelry Match: Works with most necklines, especially square or bateau, paired with simple studs for a cohesive party look.
8. One-Shoulder Waterfall Braid with Flowing Waves
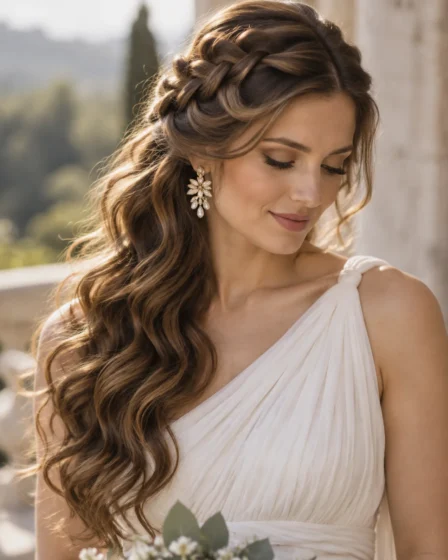
Start a waterfall braid at the temple and drop a strand at every pass so loose waves cascade below it, guiding the braid diagonally toward one shoulder. Curl the drop pieces beforehand so they fall in soft waves instead of flat strands.
💍 Bridal Stylist Hack
Run a hidden pin track along the nape underneath the visible braid. Nobody sees it from the outside, but it’s the actual thing holding the waterfall structure up as the night goes on instead of slowly sagging into a flat braid.
Neckline & Jewelry Match: One-shoulder or asymmetrical neckline, statement earring on the exposed ear since the waves already soften the other side.
9. Asymmetrical Gibson Tuck with Pearl Hairpins
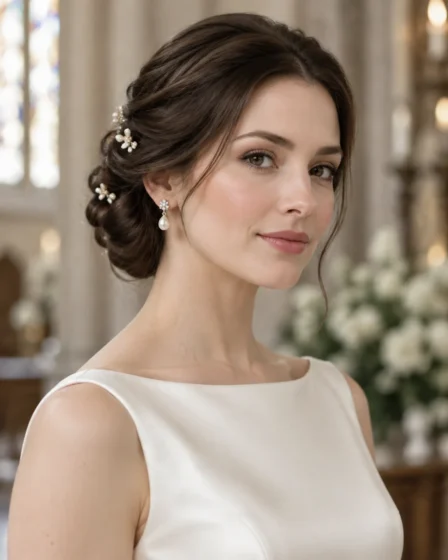
Roll hair under from one side toward the other into a horizontal tuck at the nape, hiding the pins inside the fold itself rather than on top of it. Keep the roll slightly higher on one side for the asymmetrical shape.
💍 Bridal Stylist Hack
For thick or heavy hair, backcomb the section going into the roll before tucking it. The teased hair gives the fold something to grip instead of just sliding back out, then finish with pearl hairpins angled upward for extra hold.
Neckline & Jewelry Match: High-neck or boat neckline, pearl drop or button earrings to match the pins.
10. Side Bubble Braid with Velvet or Satin Ribbons
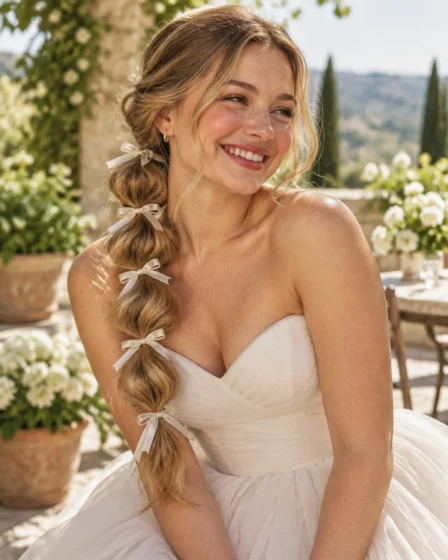
Pull hair into a low side ponytail, add small elastics every couple of inches down the length, then gently pull each section outward to form the bubble shape. Weave a velvet or satin ribbon through as you go for a soft, romantic finish.
💍 Bridal Stylist Hack
Alternate which side you fluff each bubble from, front on one, underneath on the next. Pulling from only one direction every time is what makes bubble braids look lopsided in photos, alternating keeps every bubble symmetrical.
Neckline & Jewelry Match: Off-shoulder or halter neckline, simple studs since the ribbon detail already carries the look.
11. Voluminous Half-Up Side Sweep with Barrette
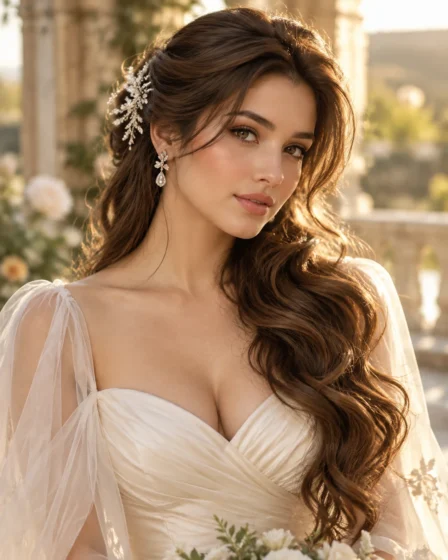
Take the top sections of hair, tease slightly at the crown for lift, sweep them to one side, and secure with a decorative barrette or comb. Leave the rest down in loose waves for a softer, less committed one-sided look.
💍 Bridal Stylist Hack
Reach for a French comb, the curved kind with several teeth, instead of a straight clip. The curve locks around the hair shaft rather than just clamping down flat, so it survives hugs and head tilts a straight clip never would.
Neckline & Jewelry Match: Sweetheart or A-line neckline, and since only half the hair moves, matching earrings on both ears still work here.
12. Traditional Floral Jasmine Gajra Side Braid
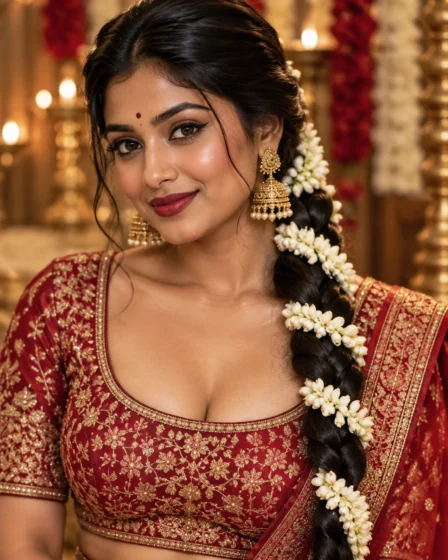
Braid hair into a single side braid, then wrap the fresh jasmine or mogra gajra string spiraling around the outside of the braid rather than weaving it through. Wrapping around instead of through distributes the flowers’ weight far more evenly down the length.
💍 Bridal Stylist Hack
Pin the gajra at multiple points along the braid, not just at the top, and slide a thin strip of cotton or net between the flowers and your hairline. It keeps flower moisture off your scalp and is what actually stops that heavy dragging headache by evening, not the braid itself. If you’re building out a full traditional look, our Indian bridal hairstyles guide has more ideas matched to face shape and dupatta weight.
Neckline & Jewelry Match: Traditional saree or lehenga blouse necklines, jhumkas or gold traditional earrings on the exposed ear.
13. Loose Spiral Curls with an Ear-Cuff Accent
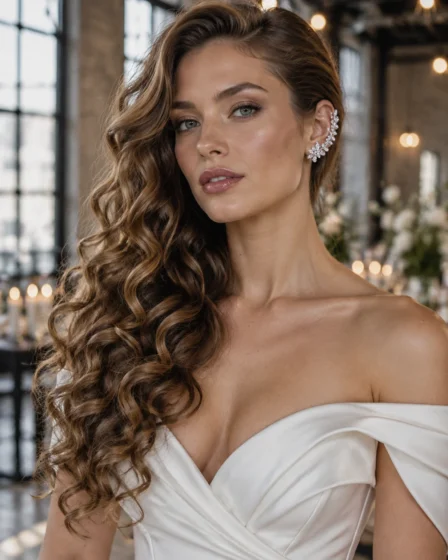
Curl hair in spiral sections with a small barrel wand for tighter, bouncier curls, then sweep the whole curtain of curls over one shoulder and pin lightly at the crown so it doesn’t slide back to center.
💍 Bridal Stylist Hack
This look is really about showing off the ear, so only mist the front hairline and part with a light hold spray. Too much product near the ear itself flattens the hair right over your cuff or earring, which defeats the entire point of the style.
Neckline & Jewelry Match: Off-shoulder or halter, built specifically to showcase a dramatic ear cuff or climbing earring instead of a drop earring.
14. Deconstructed Low Side Knot
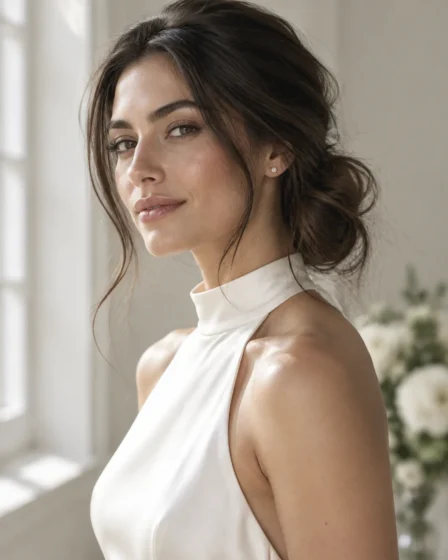
Gather hair low and to one side, twist it gently rather than tightly, then knot it loosely so a few pieces fall out on their own. This is meant to look undone on purpose, not perfectly smooth.
💍 Bridal Stylist Hack
Use only two or three pins placed at slightly different angles, not five or six. Over-pinning a deliberately messy look actually makes it look stiff, fewer pins placed well hold the shape better and keep it looking relaxed instead of arranged.
Neckline & Jewelry Match: High-neck or turtleneck-style bridal looks, a single delicate stud or small hoop for a minimalist finish.
15. Jeweled Vine Pull-Through Side Braid
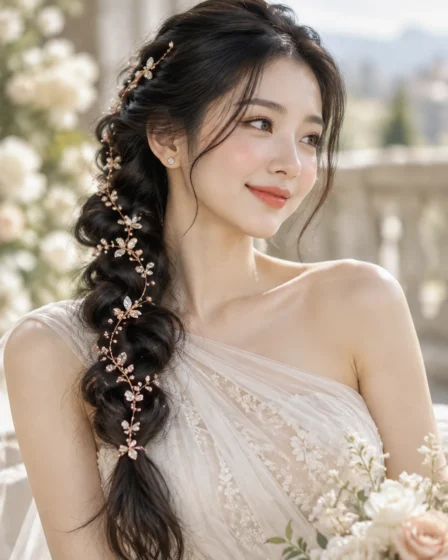
Instead of a traditional three-strand braid, use the pull-through method, looping small ponytail sections through each other diagonally toward one shoulder. It creates a similar braided look with far less tension pulling on any single section of hair.
💍 Bridal Stylist Hack
Weave the jeweled vine or hair chain into the loops as you go, not after you finish. Threading it in during the pull-through is what keeps it from sliding out later, and it means you need way fewer pins overall since the vine itself holds tension.
Neckline & Jewelry Match: One-shoulder or asymmetrical neckline, a small stud is enough since the vine already carries the sparkle near your ear.
Quick Comparison: Which One-Sided Style Fits Your Dress?
| Style | Best Neckline | Hold & Time |
|---|---|---|
| Hollywood Waves | Sweetheart | 20m • Med |
| Boho Fishtail | Off-shoulder | 15m • Med |
| Romantic Chignon | High-neck / lace | 15m • Med |
| Dutch Floral Braid | Halter / strapless | 20m • High |
| Asymmetric Pony | Halter / modern | 10m • Easy |
| Vintage Waves | Sweetheart | 25m • High |
| Messy Side Bun | Square / scoop | 10m • Easy |
| Waterfall Braid | One-shoulder | 20m • Med |
| Gibson Tuck | Boat / illusion | 15m • Med |
| Side Bubble Braid | Off-shoulder | 15m • Med |
| Half-Up Barrette | Sweetheart / A-line | 10m • Easy |
| Gajra Side Braid | Saree / lehenga | 20m • High |
| Ear-Cuff Curls | Off-shoulder | 15m • Easy |
| Deconstructed Knot | High-neck | 8m • Easy |
| Jeweled Vine Braid | One-shoulder | 20m • Med |
Post-Reception Hair Rescue
The dress goes back on its hanger. Your hair, and your scalp, still need a little help. Here’s how to actually undo the night without losing patience or hair in the process.
Removing 30+ bobby pins without pulling clumps: Work systematically from the outermost, most visible layer inward, never randomly grabbing whatever pin you spot first. Slide each pin out in the direction the hair naturally grows rather than against it, and support the section near your scalp with your other hand as you pull, so the tension goes on the pin, not your roots.
Breaking a strong-hold hairspray cast before shampooing: Warm a little coconut or argan oil between your palms and work it through completely dry hair first, before any water touches it. Let it sit for five to ten minutes, this breaks down the spray’s grip so it doesn’t turn into a gluey mess the second it hits water, then shampoo twice to fully clear it out.
Relieving scalp tension headache after a veil or heavy hairpiece: Once every pin and elastic is out, massage your scalp gently in small circles with your fingertips, focusing on wherever the comb or clips sat the longest. A cool compress on the back of the neck for a few minutes helps too, and drinking water matters more than people think, since mild dehydration makes tension headaches feel worse. If your scalp still feels sore or irritated a day or two later, our itchy scalp mask guide is worth a look.
Give your hair a few days off after all that heat, pins, and product before jumping into a new routine, and if it’s feeling thin or worn out from the whole event, our guide on getting thicker hair naturally is a good next stop. And whenever you’re ready to plan the next look, whether it’s an engagement shoot or a rehearsal dinner, we’ve got plenty more hairstyle ideas to browse through.