13 Spellbinding Witch Hairstyles For Halloween That Actually Last All Night

You spent two hours curling your hair into perfect witchy waves, put on the hat for one photo, and now it looks like something crawled out of your scalp and died there.
Or you went the teased route, backcombed until your arm hurt, and by 9pm it had collapsed into a flat, static-y mess that no amount of dry shampoo could revive.
Halloween hair has a very specific failure rate, and it’s usually because the style looked amazing in the mirror at 6pm but was never actually built to survive a hat, a dance floor, or the wind on the walk between houses.
So this list is different. Every one of these 13 witch hairstyles for Halloween was picked because it holds up past hour three, not just for the first selfie.
Some are built to sit under a pointed hat without turning into a crushed mess, others are loud enough that skipping the hat is the whole point, and a few were made specifically for short or textured hair because not every witch has waist length locks to work with.
I’ve spent enough Halloweens fixing crushed curls in a bathroom mirror at a party to know exactly where these looks fall apart, and I built every tip below around fixing that before it happens instead of after.
🎃 Quick Guide
Hat-Friendly + No-Hat
5 to 40 Min Each
1. The Morticia Sleek Pin-Straight Center Part (Hat Friendly)
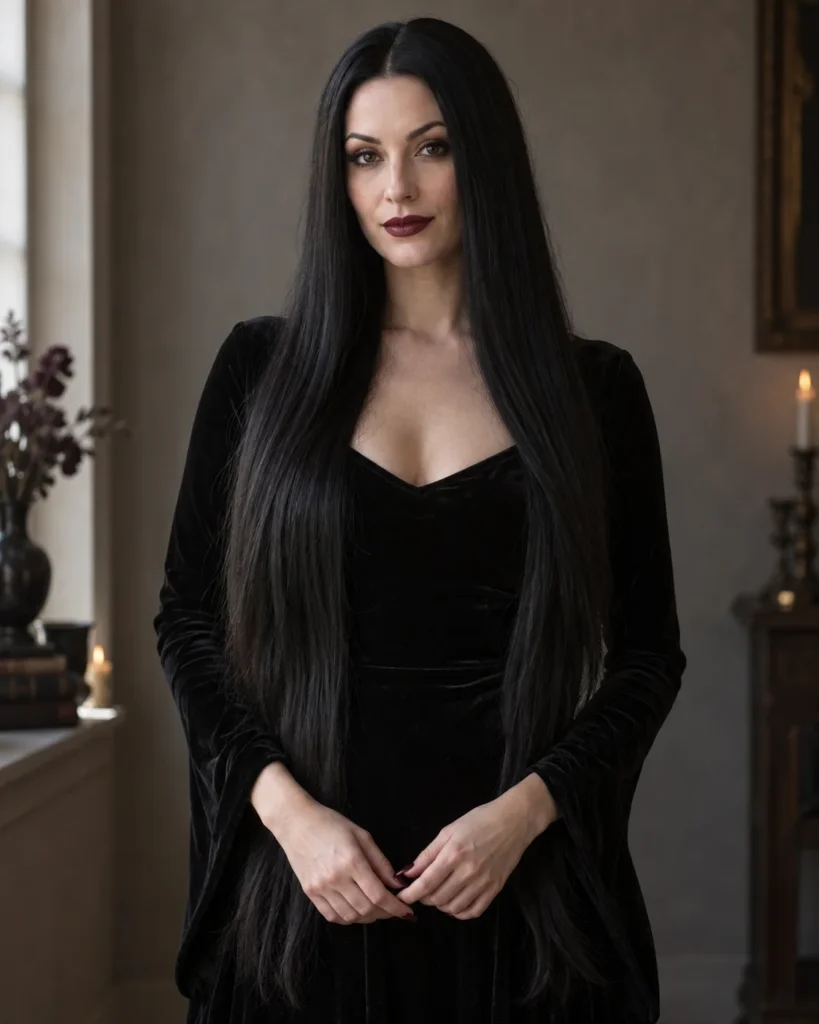
Hair goes poker straight with a flat iron, parted dead center, and smoothed with a serum or light gel so it lies flat against the scalp. No bumps, no flyaways, just a mirror flat finish that reads instantly gothic. The severity of that part does most of the work here.
Practical Reality:
- Hat status: Fully hat friendly, there’s no volume to crush
- Time: 20 to 25 minutes with a flat iron
- Best for: Long, straight or straightened hair, fine to medium texture
🕸️ Stylist Secret
Smooth flyaways with a boar bristle brush right after the hat comes off, don’t reach for a comb, it’ll separate the sleekness instead of restoring it.
Try: a small tube of edge gel for touching up the part line mid party
2. Wild Teased “Hocus Pocus” Voluminous Mane (No-Hat Statement)
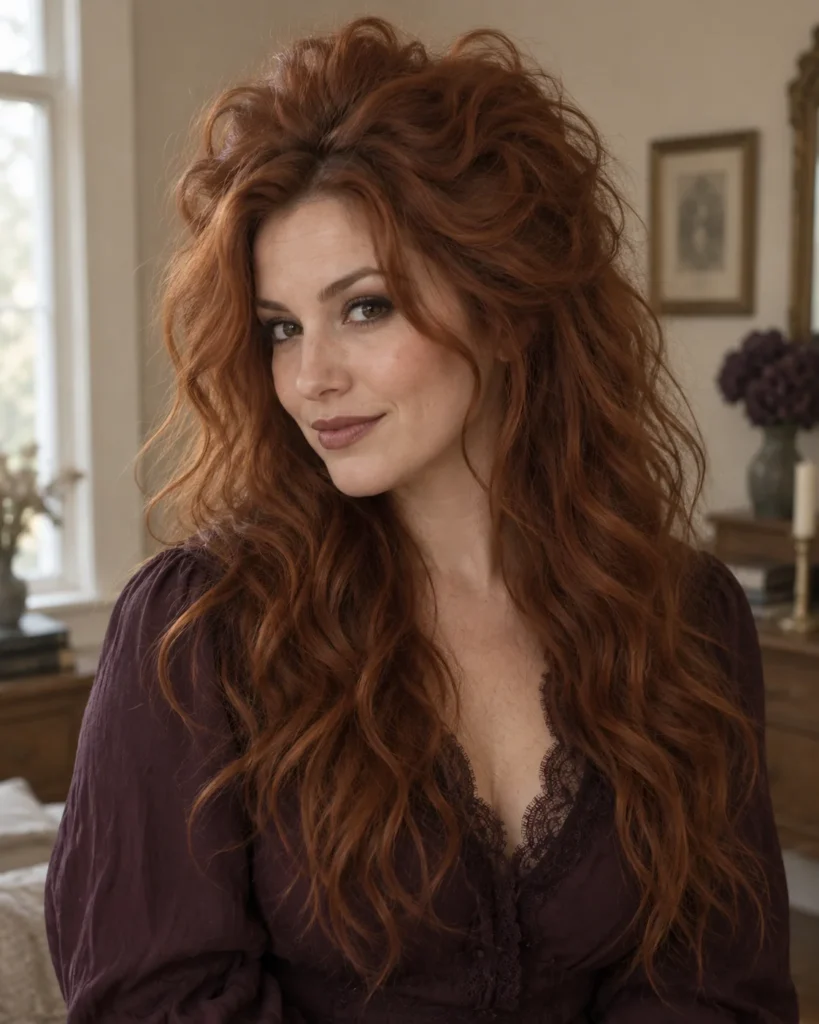
This is backcombing done properly, working in small sections at the crown and mid-lengths, then finishing with a dry texturizing spray so it holds without going stiff. Leave the ends a little uneven and wild. It’s big, it’s untamed, and it’s meant to be seen, not hidden.
Practical Reality:
- Hat status: No-hat statement, a hat will flatten this in seconds
- Time: 30 to 40 minutes for backcombing and finishing
- Best for: Medium to long hair with layers, thick or medium texture holds it best
🕸️ Stylist Secret
Always smooth the very top layer over the teased sections underneath, that one move is the difference between “dramatic witch” and “bad hair day.” If your hair struggles to hold big volume naturally, our guide on getting thicker hair naturally is worth a read before the party season hits.
Try: a dry texturizing spray, not a wet-hold hairspray
3. Double Fishtail Braids with Black Velvet Ribbons (Hat Friendly & Windproof)
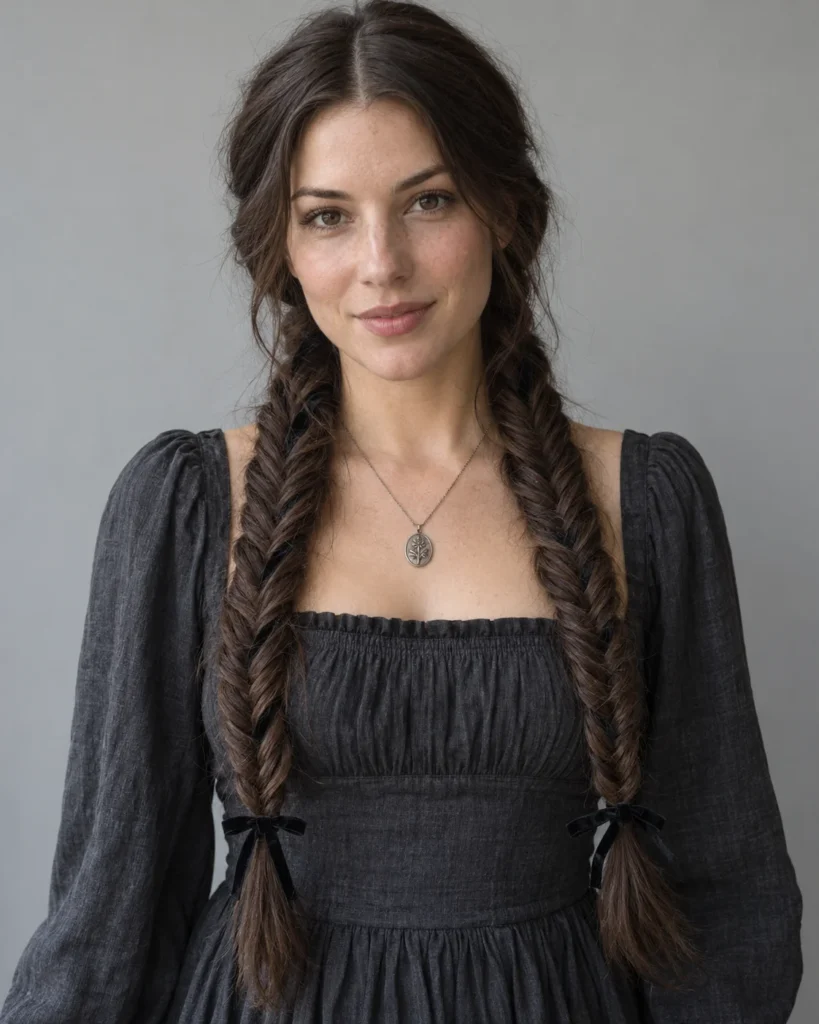
Two fishtail braids run from temple to end, with black velvet ribbon woven in every couple of inches or tied at the bottom. Leave a small section loose at the crown for softness. The ribbon detail turns a basic braid into something that actually looks intentional and witchy.
Practical Reality:
- Hat status: Hat friendly and windproof, braids lie flat and won’t move
- Time: 25 to 35 minutes for two braids
- Best for: Shoulder length or longer, straight to wavy hair, curly hair needs firmer tension while braiding
🕸️ Stylist Secret
Braid a little tighter than feels comfortable, fishtails loosen fast on their own, and spritz strong hold hairspray section by section as you go instead of just at the end.
Try: thin velvet ribbon in black or deep plum, tied in small bows along the braid
4. Spider-Accent Bubble Braids (Trendy & Fast DIY)
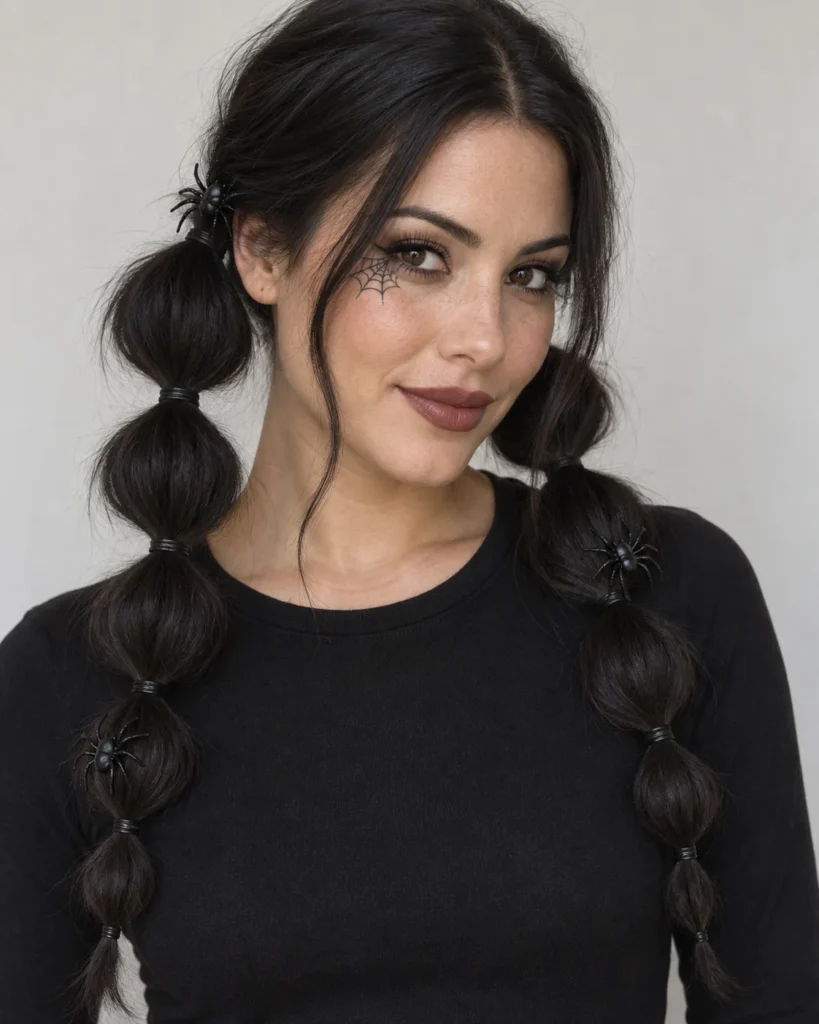
A ponytail or two pigtails get sectioned into bubbles with clear elastics every couple of inches, then a few tiny spider clips or charms get clipped onto the bubbles themselves. It’s playful, current, and the spiders do all the seasonal heavy lifting.
Practical Reality:
- Hat status: No hat needed, though a small witch hat pinned near the crown works too
- Time: 10 to 15 minutes
- Best for: Mid to long hair, great for second day hair, works on straight, wavy, or curly texture
🕸️ Stylist Secret
After securing each bubble, gently pull the sides outward to puff it up. It takes two extra seconds per bubble and reads as far more polished than it actually took to do.
Try: mini plastic spider clips, sold in most Halloween accessory sections
5. Dark Romantic Half-Up Twisted Crown (Celestial Witch Vibe)
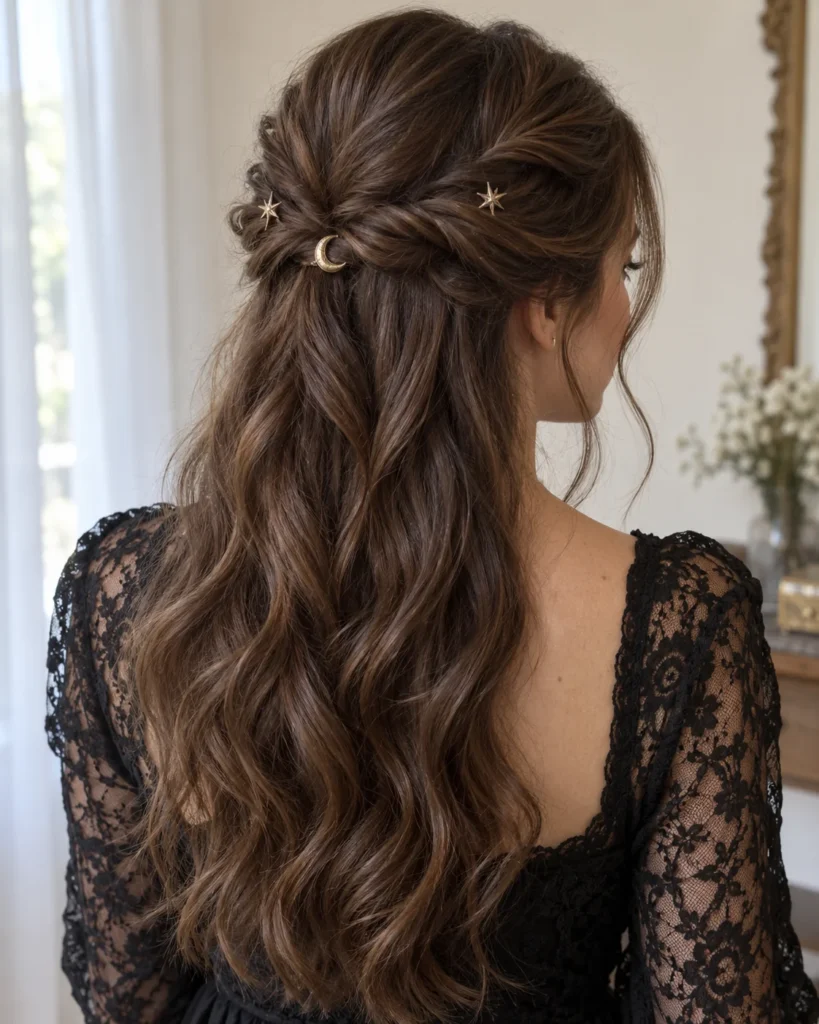
Two twisted sections from either side get pulled back and pinned at the crown in a crown-like shape, with the rest of the hair left down and wavy. Tiny star or moon hair pins tucked into the twists give it that celestial witch energy without overdoing it.
Practical Reality:
- Hat status: Mostly hat friendly, wide brim hats sit fine, tightly structured pointed hats can flatten the twist slightly
- Time: 15 to 20 minutes
- Best for: Medium to long hair, especially pretty on wavy or curly texture
🕸️ Stylist Secret
Cross the pins in an X shape when securing the twists at the crown, one straight pin holds hair, two crossed pins hold hair through three hours of dancing.
Try: small gold star or crescent moon hair pins tucked along the twist
6. Low Wand-Secured Chignon (100% Witch Hat Friendly)
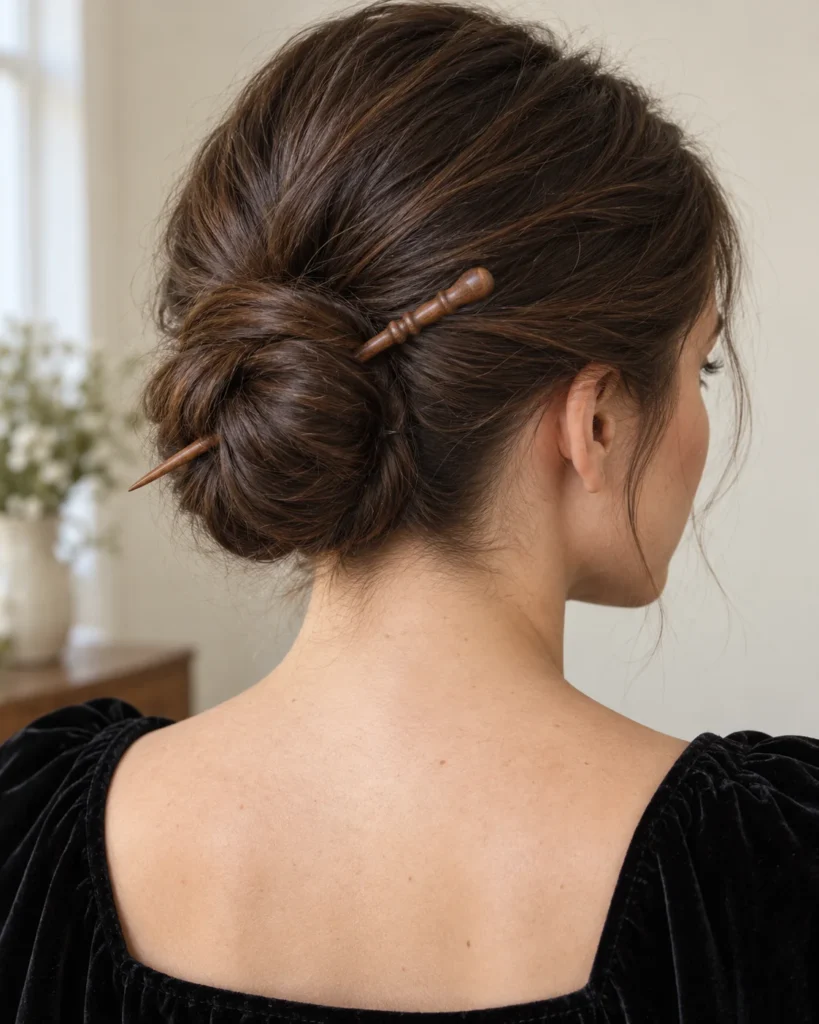
A low bun at the nape gets secured with an actual decorative wand or ornate hair stick instead of regular pins, hair smoothed back with just a few loose face-framing pieces left curled. The wand does double duty as both prop and accessory.
Practical Reality:
- Hat status: 100% witch hat friendly, sits low enough that any hat shape works
- Time: 10 to 15 minutes
- Best for: Chin length or longer, thick hair holds the bun shape best, fine hair may need a bun donut for volume
🕸️ Stylist Secret
Cross two wands or sticks through the bun instead of one. A single wand looks great in photos but tends to slip loose the second you start moving around on a dance floor.
Try: a resin or wood decorative hair stick, sold at most costume shops this time of year
7. Deep Crimped Sirens Waves with Hidden Accent Braids (Texture Focus)
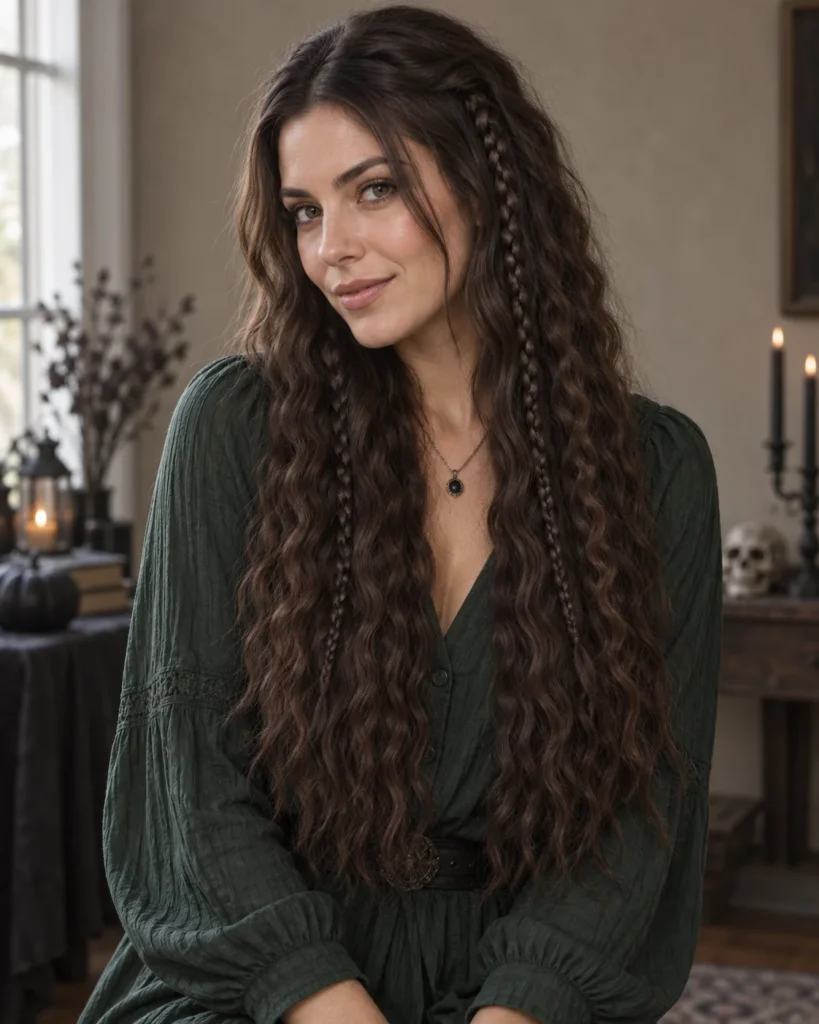
Hair gets crimped from root to tip for that crackly, electrified texture, then two or three tiny braids get tucked in near the hairline, hidden within the crimped sections rather than sitting on top of them. The result feels enchanted and a little wild, like something you’d find deep in a forest.
Practical Reality:
- Hat status: Works under wide brim hats, structured cone hats can flatten crimping right at the crown
- Time: 30 to 40 minutes for full crimping in sections
- Best for: Naturally wavy or curly hair takes to crimping fastest, straight fine hair needs more product to hold
🕸️ Stylist Secret
Focus the crimping on mid-lengths and ends rather than the roots, that’s the part a hat won’t crush, so it stays visible even after hours under one. If your natural curl or wave is already doing half the work, browse our colored curly hair ideas for ways to pair this texture with a bolder color underneath.
Try: a mini crimping iron, the small barrel size gets into shorter sections easily
8. Half-Up “Horns” Space Buns (Modern Alt / Teen Witch)
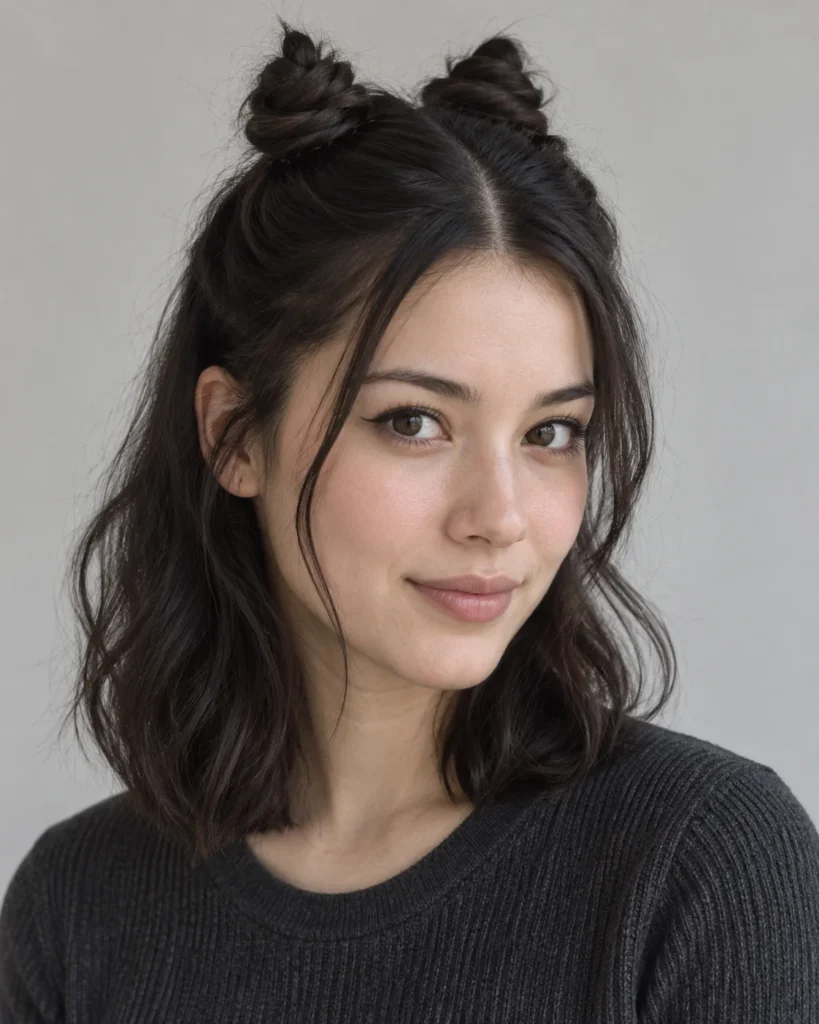
Two small space buns sit higher and closer together than usual, mimicking little horns, while the rest of the hair falls loose. Smoothing the edges with a bit of gel keeps the base sleek so the buns stay the focal point. It’s playful, a little rebellious, and very teen witch.
Practical Reality:
- Hat status: No-hat statement, the buns sit too high for most hats, though a mini pinned hat between them works as an accent
- Time: 10 minutes
- Best for: Any length long enough for a ponytail, great second-day hair fix, curly hair buns up with minimal effort
🕸️ Stylist Secret
Wrap each section around its own base before pinning instead of just twisting it. Wrapped buns hold their shape through hours of dancing, twisted ones start drooping by midnight.
Try: a couple of small claw clips as backup in case the buns start slipping
9. Slicked-Back Wet Look with Undone Lengths (High-Fashion Runway Witch)
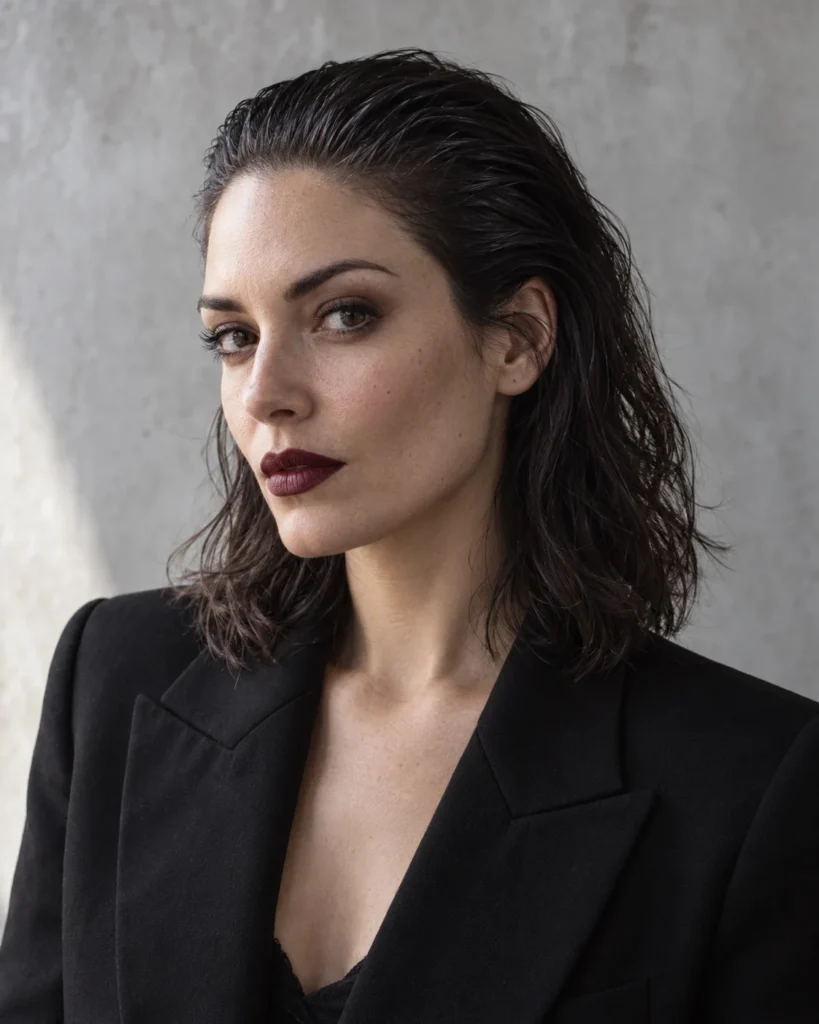
Gel or styling cream gets slicked straight back from the hairline through the crown with no part at all, while the lengths stay loose and slightly tousled for contrast. That sharp wet-look top meeting undone ends is straight off a runway, not a costume aisle.
Practical Reality:
- Hat status: Hat friendly at the crown since it’s already flat, lengths underneath can look smashed and need a scrunch after
- Time: 10 to 15 minutes
- Best for: Any length, works best without heavy layers right at the crown
🕸️ Stylist Secret
Apply gel with a fine-tooth comb going in one direction only. Going back and forth over the same section leaves visible comb lines once it dries, and there’s no fixing that later.
Try: a strong-hold styling gel, the kind that dries with a slight sheen rather than crunch
10. Side-Swept Dutch Braid (Cloak & Cape Friendly)
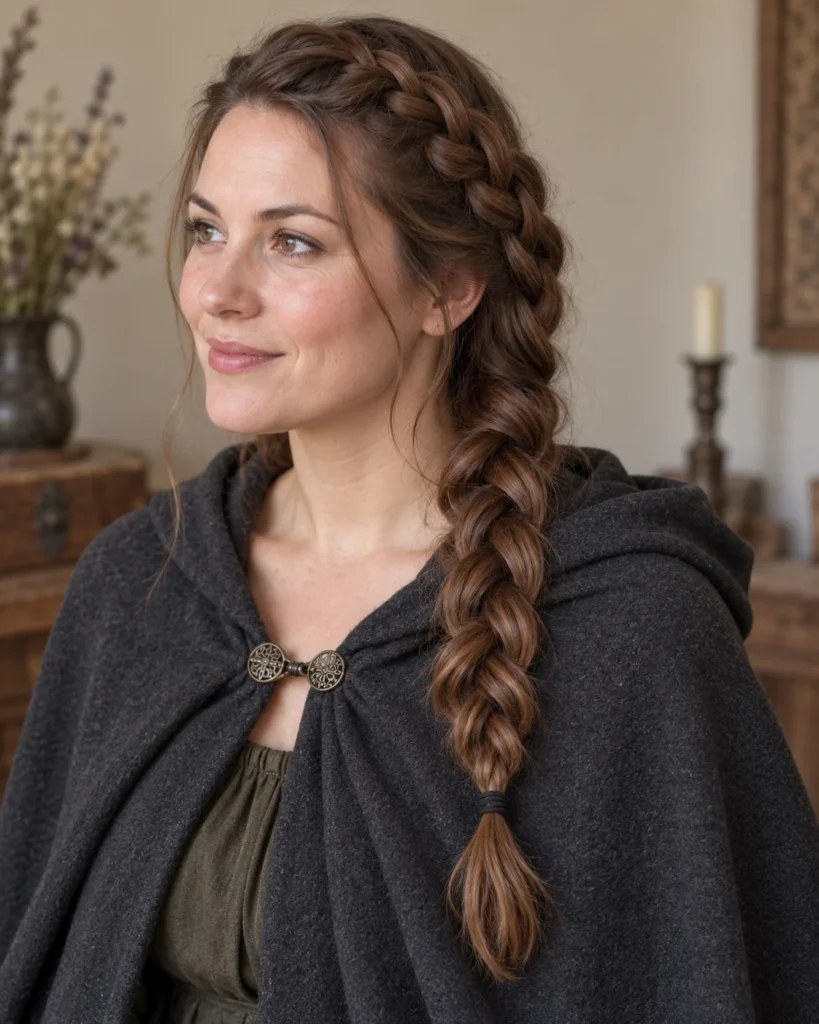
A single dutch braid starts at one temple and sweeps diagonally across the head, then continues down over one shoulder, ends left loose or tucked. The asymmetry alone makes it look intentional, and it sits neatly under a cape hood without catching or tangling.
Practical Reality:
- Hat status: Hat friendly and cloak friendly, stays close to the head
- Time: 15 to 20 minutes
- Best for: Shoulder length or longer, straight to wavy hair holds the shape cleanest, very curly hair needs extra product for smoothness
🕸️ Stylist Secret
Braid slightly against the direction hair naturally falls for extra lift at the part, and tuck the tail under with a bobby pin so it never peeks out from under a hood.
Try: a small amount of edge control on the starting section for a cleaner root
11. Silver / Neon Skunk-Stripe Money Piece (No-Bleach Temporary Pop)
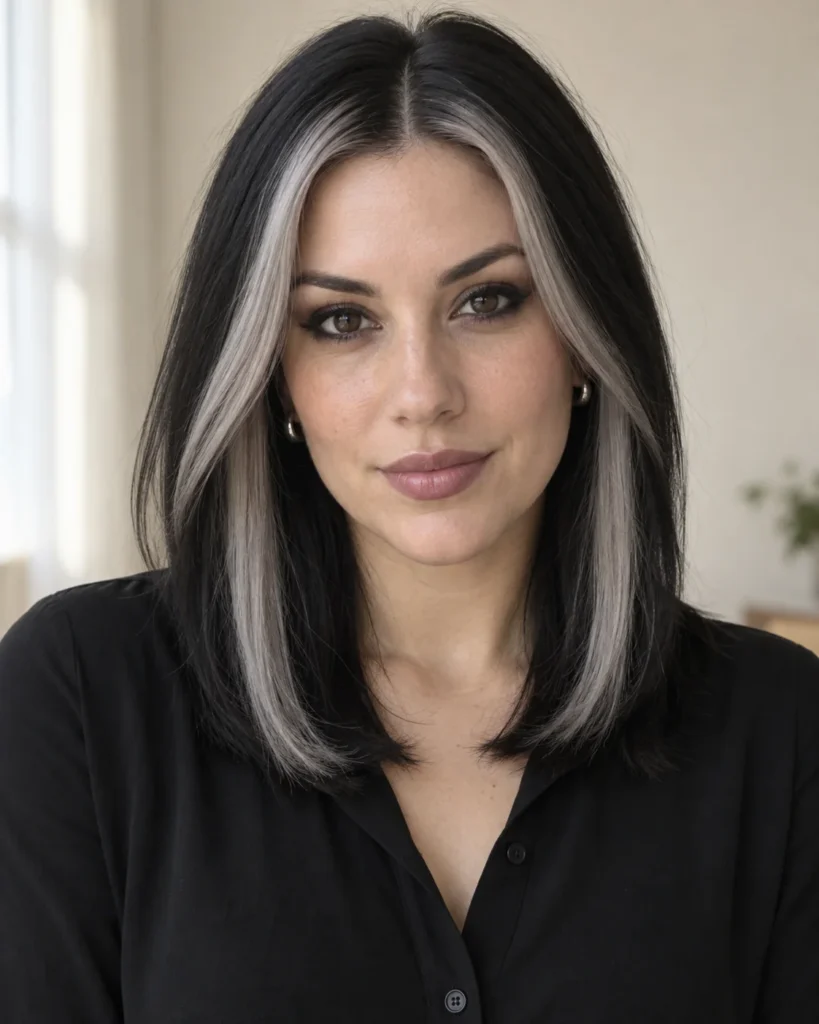
One or two face-framing pieces get colored with temporary hair chalk, a color mascara wand, or clip-in extensions in silver or neon, while the rest of the hair stays in whatever base style you’re already wearing. It’s pure color contrast with zero commitment.
Practical Reality:
- Hat status: Works with any hat style since it’s a color detail, not a structural one
- Time: 5 to 10 minutes
- Best for: Any length or texture, works especially well layered on top of styles 1, 6, or 10
🕸️ Stylist Secret
Apply temporary color to dry hair before any other product goes in. Hairspray and gel applied first can make chalk or wand color grab unevenly and look patchy. If you love the pop and want to make it permanent later, our hair color ideas section has plenty of silver and dimensional options to look at.
Try: temporary color mascara sticks, easiest to control and washes out in one shampoo
12. Choppy Textured Shag / Wolf Cut with Micro-Bangs (Short/Medium Hair Hero)

This one leans on the cut itself rather than building a new shape. Tousle the natural layers with a texturizing spray or wax, then push the micro-bangs slightly to the side or piece them apart for a lived-in, messy finish. No smoothing required, the choppiness is the point.
Practical Reality:
- Hat status: Mostly a no-hat statement since a full hat covers most of what makes this cut work, a small pinned mini hat can still work as an accent
- Time: 5 to 10 minutes, the fastest style on this whole list
- Best for: Short to medium hair, this look exists for the wolf cut and shag crowd specifically
🕸️ Stylist Secret
Scrunch texturizing spray upward into damp roots for lift that actually lasts, spraying it on top at the end just sits on the surface and falls flat within the hour. Need more short and medium length ideas beyond Halloween? Our hair length guide is a good next stop.
Try: a matte texturizing paste rather than a shine-based one, shine fights the messy effect
13. Gothic Victorian Gibson Girl Roll Updo (Antique Occult Aesthetic)
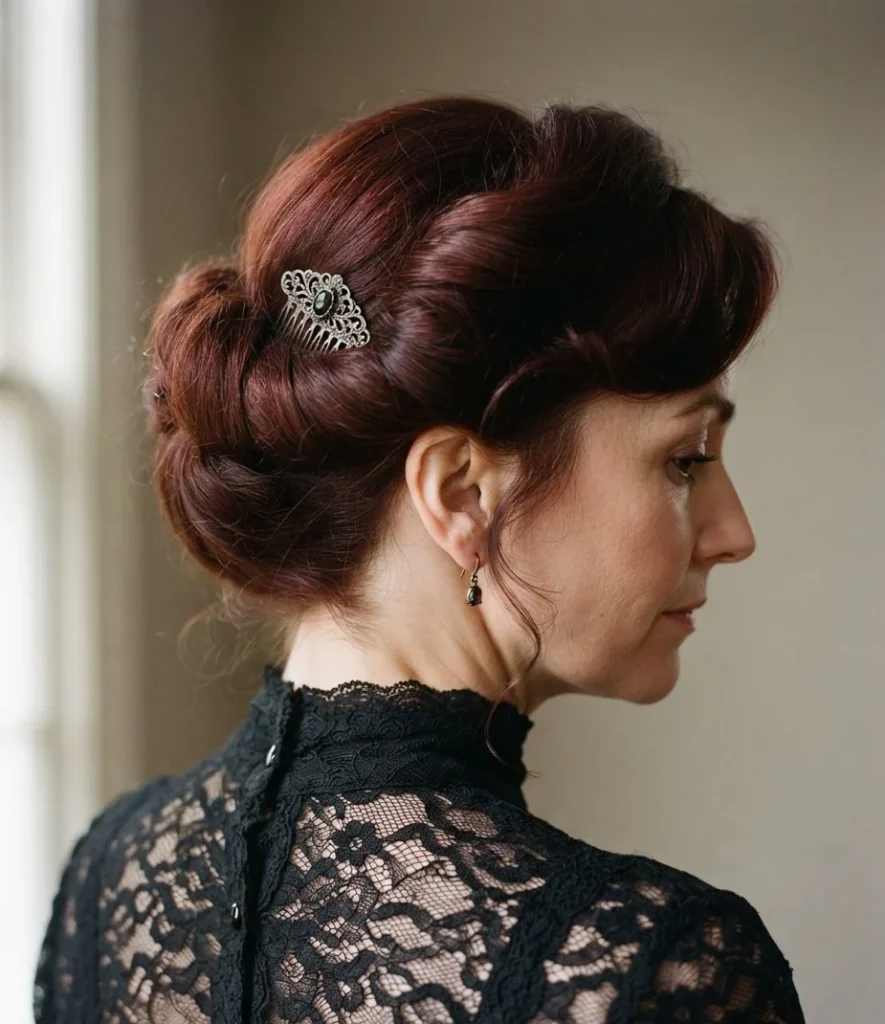
Hair gets rolled under and pinned around the head in a soft, structured roll, often with a small pouf at the front, finished off with an antique-style hair comb or a dark ribbon. It has that old-world portrait quality, like a witch painted a hundred years ago.
Practical Reality:
- Hat status: Hat friendly since the roll sits close and structured, very wide brim hats may need extra pins at the crown for balance
- Time: 25 to 35 minutes, the most technical style on this list
- Best for: Long hair rolls most easily, medium hair can use a hair rat or sock bun insert for volume
🕸️ Stylist Secret
Pin the roll in three spots, not one. A single pin feels secure when you check it in the mirror, but it never survives past song two of the party.
Try: an antique-finish hair comb or a wide dark ribbon tied at the base
| Hairstyle | Best For / Hat Compatibility |
|---|---|
| 1. Morticia Sleek Center Part | Long straight hair, fully hat friendly |
| 2. Hocus Pocus Voluminous Mane | Medium to long hair, no-hat statement |
| 3. Double Fishtail Braids | Shoulder length+, hat friendly & windproof |
| 4. Spider Bubble Braids | Mid to long hair, hat optional |
| 5. Twisted Celestial Crown | Medium to long hair, mostly hat friendly |
| 6. Wand-Secured Chignon | Chin length+, 100% hat friendly |
| 7. Crimped Sirens Waves | Wavy or curly hair, wide brim friendly |
| 8. Half-Up Horns Space Buns | Ponytail length+, no-hat statement |
| 9. Slicked-Back Wet Look | Any length, hat friendly at crown |
| 10. Side-Swept Dutch Braid | Shoulder length+, hat & cloak friendly |
| 11. Skunk-Stripe Money Piece | Any length, works with any hat |
| 12. Choppy Shag / Wolf Cut | Short to medium hair, mostly no-hat |
| 13. Gibson Girl Roll Updo | Long hair best, hat friendly |
Frequently Asked Questions
How do you fix hat hair after wearing a witch hat all night?
Don’t reach for a brush right away, that just spreads the flatness around. Flip your head over and shake the roots out with your fingers first, then use a dry shampoo or texturizing spray at the crown and scrunch upward instead of brushing through.
If pins were involved, check for tension headaches too, and if your scalp feels sore or itchy the morning after tight braids or buns, a scalp-focused treatment like the ones in our hair masks for itchy scalp guide helps a lot.
What’s the safest way to tease hair without breaking it?
Work in small, thin sections rather than grabbing a big chunk at once, and always back comb from mid-length downward, never starting right at the root. A boar bristle or teasing brush with soft bristles causes far less breakage than a fine-tooth comb.
When you’re taking it out the next day, spray in a little leave-in conditioner first and gently work through with your fingers before a brush ever touches it.
What are good witch hairstyle options for short hair?
Short hair actually has more witchy options than people think. The choppy shag with micro-bangs from this list was basically built for it, and the half-up horns space buns work as long as your hair reaches a small ponytail at the crown.
A slicked-back wet look also reads just as dramatic on a bob as it does on long hair, sometimes more, since there’s less length to fight with.
None of these looks need a professional stylist or a two-hour head start, they just need the right technique for your hair type and a plan for what happens after the hat comes off.
Pick the one that matches how long you’re actually planning to be out, not just how it looks in the mirror at home.
That’s really the whole difference between witch hairstyles for Halloween that photograph well and ones that survive the entire night.